Page 72 - 3D Artist 110 - 2017 UK
P. 72
Techniques


           3DS MAX, FOREST PACK PRO


          Create


          parametric


          environments


              he best systems are easy to adapt. clients can be ickle,
              changes will always need to be made and deadlines are
          Tnever as far away as we would like. in these situations, a
          parametric system that enables you to change a single
          element to update the related parts of a whole scene can save
          signiicant time. in this tutorial we’ll look at a technique to
          create procedural islands inspired by the scarif environments
          of Rogue One. in the inished system, raising an island above
          the waterline automatically creates textures, spawns
          thousands of high-poly trees and bushes, and even places an
          occasional thatched hut. Along the shoreline pebbles and
          rocks appear, and waves ripple against the sandy beaches.
            To achieve this we’ll make extensive use of Forest Pack Pro,
          a procedural scattering tool for 3ds Max. The setup uses six
          Forest Pack Objects: one each for the large palms, the small
          palms and bushes, the rocks, the pebbles along the shoreline,
          the underwater plants and inally the thatched huts. each one
          uses a very similar methodology: irst scatter geometry based
          on the altitude of the terrain; next, remove scattered objects
          from any unwanted areas; then deine the distribution
          pattern; and inally, randomise the geometry, transforms and
          textures. The slight differences in each of these stages
          enables the six Forest Objects to work together as a uniied
          ecosystem. Let’s start by looking at how to set up the scene’s
          geometry and materials.

                                                                                                  01
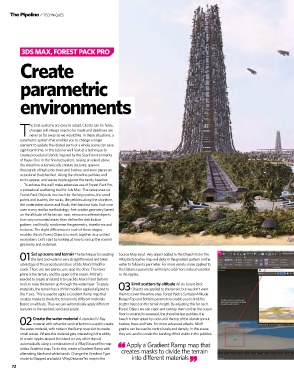
               Set up scene and terrain The technique for creating   source Map input. Any object added to the Objects list in the
          01  the land and water is very straightforward and takes   VRayDistanceTex map will deform the gradient pattern on the
          advantage of the procedural nature of 3ds Max’s Modiier   water to follow its perimeter. For more variety, noise applied to
          stack. There are two planes, one atop the other. The lower   the Distance parameter will help to add more natural variation
          plane is the terrain, and the upper is the ocean. All that’s   to the ripples.
          needed to create an island is to use 3ds Max’s Paint Deform
          tools to raise the terrain up through the water layer. To apply   Limit scatters by altitude All six Forest Pack
          materials, the terrain has a uVW modiier applied aligned to  03  Objects are applied to the terrain, but we don’t want
          the Y axis. This is used to apply a Gradient Ramp map that   them to cover the entire area. Forest Pack‘s surface>Altitude
          creates masks to divide the terrain into different materials   Range>Top and Bottom parameters enable you to limit the
          based on altitude. Thus we can automatically apply different   scatter based on the terrain height. By adjusting this for each
          textures to the sea bed, sand and jungle.   Forest Object we can stack and overlap them so that the ocean
                                                      loor is covered in seaweed, the shoreline has pebbles, the
                Create the water material A standard V-Ray   beach is interrupted by rocks and the top of the islands sprout
          02  material with refraction and relection is used to create   bushes, trees and huts. For more advanced effects, falloff
          the water material, with noise in the Bump map slot to create   graphs can be used to control scale and density. in this scene
          small waves. Where this material gets interesting is the ability   they are used to create the banding effect visible in the pebbles.
          to create ripples around the island (or any other object)
          automatically using a combination of a VRayDistanceTex map    Apply a Gradient Ramp map that
          with a Gradient map. To do this, create a Gradient Ramp with
          alternating black and white bands. change the Gradient Type   creates masks to divide the terrain
          mode to Mapped and add a VRayDistanceTex map to the   into different materials
      72

