
Page 74 - 3D Artist 110 - 2017 UK
P. 74
Techniques
04
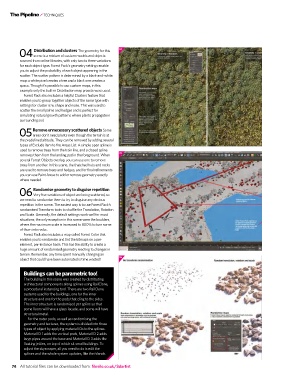
Distribution and clusters The geometry for this
04 scene is a mixture of custom models and objects
sourced from online libraries, with only two to three variations
for each object type. Forest Pack’s geometry settings enable
you to adjust the probability of each object appearing in the
scatter. The scatter pattern is determined by a black-and-white
map: a white pixel creates a tree and a black one creates a
space. Though it’s possible to use custom maps, in this
example only the built-in Distribution map presets were used.
Forest Pack also includes a helpful clusters feature that
enables you to group together objects of the same type with
settings for cluster size, shape and noise. This was used to
scatter the small palms and hedges and is perfect for
simulating natural growth patterns where plants propagate in
surrounding soil.
Remove unnecessary scattered objects some
05 areas don’t need plants even though the terrain is at
the predeined altitude. They can be removed by adding several
types of exclude item to the Areas List. A simple open spline is
used to remove trees from the train line, and a closed spline
05
removes them from the landing pad in the foreground. When
several Forest Objects overlap, you can use one to remove
trees from another. in this scene, the thatched huts and rocks
are used to remove trees and hedges, and for inal reinements
you can use Paint Areas to add or remove geometry exactly
where needed.
Randomise geometry to disguise repetition
06 Very few variations of object are being scattered, so
we need to randomise them to try to disguise any obvious
repetition in the scene. The easiest way is to use Forest Pack’s
randomised Transform tools to shufle the Translation, Rotation
and scale. Generally, the default settings work well for most
situations; the only exception in this scene were the boulders,
where the maximum scale is increased to 800% to turn some
of them into rocks.
Forest Pack also includes a map called Forest color that
enables you to randomise and tint the bitmaps on a per-
element, per-instance basis. This has the ability to create a
huge amount of randomised geometry reacting to changes in
terrain. Remember, any time spent manually changing an
06
object that could have been automated is time wasted!
Buildings can be parametric too!
The building in this scene was created by distributing
architectural components along splines using Railclone,
a procedural instancing tool. There are two Railclone
systems used for the buildings, one for the inner
structure and one for the pods that cling to the sides.
The inner structure is randomised per spline so that
some loors will have a glass facade, and some will have
structural metal.
For the outer pods, as well as randomising the
geometry and textures, the system is divided into three
types of object by applying material iDs to the splines.
Material iD 1 adds the vertical pods, Material iD 2 adds
large pipes around the base and Material iD 3 adds the
loating jetties, on top of which sit small buildings. To
adjust the skyscraper, all you need to do is edit the
splines and the whole system updates, like the islands.
74 All tutorial files can be downloaded from: filesilo.co.uk/3dartist