
Page 70 - 3D Artist 110 - 2017 UK
P. 70
TECHNIQUES
05 06
Ground the glass with sealant In the reference
05 images there was a sealant used to seat the windows
against the framing. Adding details like this add a soft breakup
to the rigid painted metal and glass. First I use a Bevel to create
a small ramp and a noise setup. I plug this in to a Blend node set
to Subtract. Then I use the Directional Warp and Slope Blur
Grayscale nodes to create the sealant. The Directional Warp
node will help offset the noise so that each pane of glass has a
different look. The Slope Blur Grayscale node will provide a nice
layered look, as though the sealant was pressed and oozed out.
Simple material deinition pass At this point the
06 height and normal maps are well established and I will
do a simple material deinition pass to bring some life to the
surface. For the industrial windows I am using a Spec/Gloss
worklow. Dielectric surfaces have a specular value of 59. For
the Gloss map I used the following values: glass (245), painted
metal (147) and sealant (65). The albedo values are glass (55),
painted metal (154) and sealant (191). For each portion I
plugged Uniform Color nodes into Blend nodes along with
masks connected to the Opacity of the Blend node.
Storytelling on the window panes For starters a
07
07 glass albedo should be on the darker side, as this will
create a nice contrast when the light hits the surface. I wanted
to create windows that look aged and are cloudy. To do this I
added surface details such as vertical streaking and smudges in
the albedo and gloss. Additionally, I added stains that are lower
opacity in the albedo but do not appear in the Gloss map. This
way, when the light rolls across it looks like the stain is behind
the glass. Having details like this adds a lot of dimension and
gives the glass some perceived thickness.
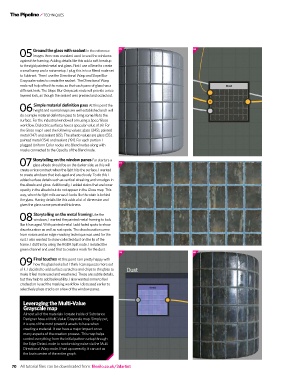
Storytelling on the metal framing Like the
08 windows, I wanted the painted metal framing to look
like it has aged. With painted metal I add faded spots to show
discolouration as well as rust spots. The discolouration came
from noises and an edge-masking technique was used for the
rust. I also wanted to show collected dust on the lip of the
frame. I did this by using the RGBA Split node. I isolated the
green channel and used that to create a mask for the dust.
08 09
Final touches At this point I am pretty happy with
09 how the glass looks but I think I can squeeze more out
of it. I decided to add surface scratches and chips to the glass to
make it feel more used and weathered. These are subtle details,
but they help to add believability. I also wanted some to feel
cracked so I used the masking worklow I discussed earlier to
selectively place cracks on a few of the window panes.
Leveraging the Multi-Value
grayscale map
Almost all of the materials I create inside of Substance
Designer have a Multi-Value Grayscale map. Simply put,
it is one of the most powerful assets to have when
creating a material. It can have a major impact on so
many aspects of the creation process. This map helps
control everything from the initial pattern setup through
the Edge Detect node to randomising noise via the Multi
Directional Warp node. If set up correctly, it can act as
the brain centre of the entire graph.
70 All tutorial files can be downloaded from: filesilo.co.uk/3dartist