
Page 66 - 3D Artist 110 - 2017 UK
P. 66
Build a steampunk weapon in Blender
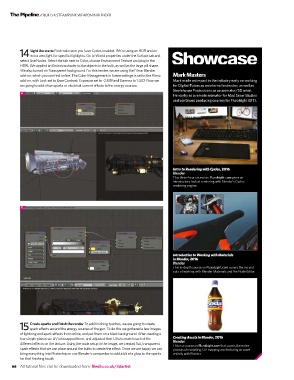
Light the scene First make sure you have Cycles enabled. we’re using an Hdr and an
14 extra area light for speciic highlights. Go to world properties under the surface tab and
select use nodes. select the tab next to Color, choose environment texture and plug in the
Hdri. we applied an emission shader to the objects in the bulb, as well as the large pill shape.
we also turned on transparent background. For this render, we are using the Filmic Blender
add-on, which you can ind online. the Color management in scene settings is set to the Filmic Mark Masters
add-on, with look set to Base Contrast, exposure set to -2.839 and Gamma to 1.402. now we Mark made an impact in the industry early on working
are going to add a few sparks or electrical current effects to the energy sources. for Digital-Tutors as an internal instructor, as well as
Steelehouse Productions as an animator/3D artist.
14
He works as a remote animator for Mad Snow Studios
and continues producing courses for Pluralsight (DT).
Intro to Rendering with Cycles, 2016
Blender
this three-hour course on Pluralsight.com gives an
introductory look at rendering with Blender’s Cycles
rendering engine.
15
Introduction to Working with Materials
in Blender, 2016
Blender
this in-depth course on Pluralsight.com covers the ins and
outs of working with Blender materials and the node editor.
Create sparks and inish the render to add inishing touches, we are going to create
15 spark effects around the energy sources of the gun. to do this we gathered a few images
of lightning and spark effects from online, and put them on a black background. after creating a
few simple planes we uV unwrapped them, and adjusted their uVs to match each of the Creating Assets in Blender, 2016
Blender
different effects on the texture. using the node setup in the image, we created lat, transparent
this is a course on Pluralsight.com that covers the entire
spark effects that we can place around the bulbs to create the effect. once we are happy we can process of modelling, uV mapping and texturing an asset
bring everything into photoshop or use Blender’s compositor to add a bit of a glow to the sparks entirely with Blender.
for that inishing touch.
66 All tutorial files can be downloaded from: filesilo.co.uk/3dartist