
Page 64 - 3D Artist 110 - 2017 UK
P. 64
Build a steampunk weapon in Blender
04 05
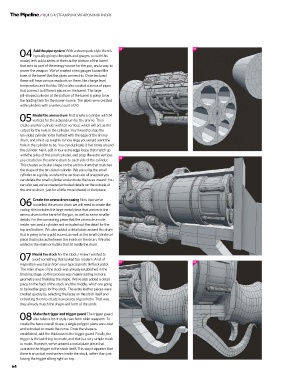
Add the pipe system with a steampunk style there’s
04 typically going to be pipes and gauges, so with this
model, let’s add a series of them at the bottom of the barrel
that acts as part of the energy source for the gun, and a way to
power the weapon. we’ve created a few gauges toward the
base of the barrel that the pipes connect to. once textured
these will have various readouts on them, like charge level,
temperature and the like. we’ve also created a series of pipes
that connect to different places on the barrel. the large
pill-shaped cylinder at the bottom of the barrel is going to be
the holding tank for the power source. the pipes were created
with cylinders with a vertex count of 20.
Model the ammo drum First create a cylinder with 24
05 vertices for the actual drum for the ammo. then
create another cylinder with ten vertices, which will act as the
cutout for the hole in the cylinder. You’ll want to snap the
ten-sided cylinder to be lushed with the edge of the ammo
drum, and size it up roughly to how large you would want the
hole in the cylinder to be. You can duplicate it ive times around
the cylinder. next, add in four extra edge loops that match up
with the sides of the small cylinder, and snap the extra vertices
06
you created on the ammo drum to each side of the cylinder.
this creates a circular shape on the ammo drum that matches
the shape of the ten-sided cylinder. we are using the small
cylinder as a guide, so when the vertices are all snapped you
can delete the small cylinder and extrude the faces inward. You
can also see we’ve created extruded details on the outside of
the ammo drum, just for a little more interest in that piece.
Create the ammo drum casing now that we’ve
06 modelled the ammo drum we will need to create the
casing; this includes the large metal piece that connects the
ammo drum to the barrel of the gun, as well as some smaller
details. For the connecting piece that the ammo drum sits
inside, we used a cylinder and extruded out the detail for the
top and bottom. we also added a detail plate around the drum
that is going to be a gold accent, as well as the small cylindrical
piece that is placed between the insets on the drum. we also
added in the shells or bullets that sit inside the drum.
Model the stock For the stock, i knew i wanted to
07 avoid something that looked too modern. a lot of
07 08
inspiration was taken from your typical pirate lintlock pistol.
the main shape of the stock was already established in the
blocking stage, so this process was mainly adding in more
geometry and inalising the shape. we’ve also added a detail
piece on the back of the stock and the middle, which are going
to be leather grips for the stock. the extra leather pieces were
created quickly by selecting the faces on the stock itself and
extracting them to create new pieces of geometry. that way,
they already match the shape and form of the stock.
Make the trigger and trigger guard the trigger guard
08 also takes a lot of style cues from older weapons. to
create the basic overall shape, a single polygon plane was used
and extruded to create the curve. once the shape is
established, add the thickness to the trigger guard. Finally, the
trigger is the last thing to create, and that is a very simple mesh
to make. However, we’ve created a metal plate piece that
connects the trigger to the stock itself. this way it appears that
there is an actual mechanism inside the stock, rather than just
having the trigger sitting right on top.
64