
Page 65 - 3D Artist 110 - 2017 UK
P. 65
09 10
Model the inal details we can start to add inishing
09 touches to the model such as bolts, screws and rivets.
we will create four different types of bolts placed throughout
the model. there’s the larger bolt to be placed along the ring
around the front of the barrel, then the small rivets with the
indentation will be used for the wood and leather. the lat-head
screws will be used for a lot of the metal pieces. Finally, the last
rivet is a simple half-sphere shape that will be used on some of
the pipe pieces, and for details for the ammo drum. we’ve also
created very simple lightbulb shapes.
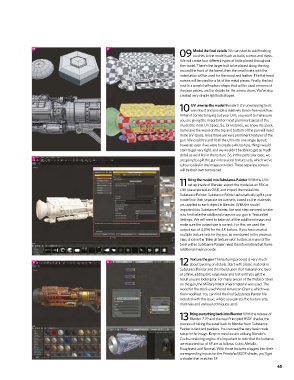
UV unwrap the model Blender’s uV unwrapping tools
10 are robust and provide a relatively stress-free worklow.
when it comes to laying out your uVs, you want to make sure
you are giving the important or most prominent areas of the
model the most uV space. so, for instance, we know the stock,
barrel and the wood on the top and bottom of the gun will need
more uV space, since these are very prominent features of the
gun. we could try and it all the uVs into one single layout;
however, even if we were to create a 4k texture, things would
start to get very tight, and we wouldn’t be able to get as much
detail as we’d like in the texture. so, in this particular case, we
11
are going to split the gun into several texture sets, which we’ve
colour-coded in the image provided. these separate colours
will be their own texture set.
Bring the model into Substance Painter with the uVs
11 set up inside of Blender, export the model as an FBX or
oBJ (we exported as oBJ), and import the model into
substance painter. substance painter automatically splits your
model into their separate texture sets, based on the materials
you applied to each object in Blender. with the model
imported into substance painter, the next step we need to take
is to irst bake the additional maps for our gun in textureset
settings. we will want to bake out all the additional maps and
make sure the output size is correct. For this, we used the
output size of 4,096 for the 4k texture. if you have created
multiple texture sets for the gun, as mentioned in the previous
step, choose the ‘Bake all texture sets’ button, as many of the
tools within substance painter need the information that these
additional maps provide.
Texture the gun the texturing process is very much
12 13
12 about layering on details. start with a base material in
substance painter and then build upon that material one layer
at a time, adding dirt, edge wear and rust until you get the
result you are looking for. For many pieces of the metal or steel
on the gun, the military metal smart material was used. the
wood for the stock used wood american Cherry, which was
then modiied. You can ind the inal substance painter ile
included with this issue, where you can see the texture sets,
materials and various techniques used.
Bring everything back into Blender with the release of
13 Blender 2.79 and the new principled BsdF shader, the
process of taking the asset back to Blender from substance
painter is fast and painless. You can see the very basic node
setup in the image. keep in mind we are utilising Blender’s
Cycles rendering engine. it’s important to note that the textures
we exported out of sp are as follows: Color, metallic,
roughness and normal. with those textures plugged into their
corresponding inputs for the principled BsdF shader, you’ll get
a shader that matches sp.
65
65