Page 2085 - Foton Workshop Manual - Tunland (AT)
P. 2085

SUPPLEMENTAL RESTRAINT SYSTEM - CLOCK SPRING                         62-15

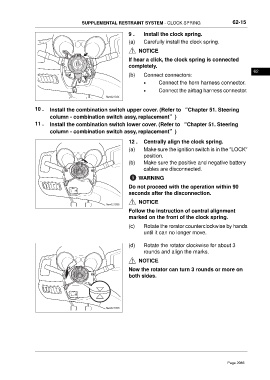
                                                           9 .    Install the clock spring.
                                                           (a)    Carefully install the clock spring.

                                                                NOTICE
                                                           If hear a click, the clock spring is connected
                                                           completely.
                                                                                                                     62
                                                           (b)    Connect connectors:
                                                                  •      Connect the horn harness connector.
                                                                  •      Connect the airbag harness connector.
                                                 ftwx621034

                 10 .   Install the combination switch upper cover. (Refer to “Chapter 51. Steering
                        column - combination switch assy, replacement”)
                 11 .   Install the combination switch lower cover. (Refer to “Chapter 51. Steering

                        column - combination switch assy, replacement”)

                                                           12 .   Centrally align the clock spring.
                                                           (a)    Make sure the ignition switch is in the "LOCK"
                                                                  position.
                                                           (b)    Make sure the positive and negative battery
                                                                  cables are disconnected.

                                                                WARNING
                                                           Do not proceed with the operation within 90
                                                           seconds after the disconnection.
                                                                NOTICE
                                                 ftwx621035
                                                           Follow the instruction of central alignment
                                                           marked on the front of the clock spring.
                                                           (c)    Rotate the rorator counterclockwise by hands
                                                                  until it can no longer move.


                                                           (d)    Rotate the rotator clockwise for about 3
                                                                  rounds and align the marks.

                                                                NOTICE

                                                           Now the rotator can turn 3 rounds or more on
                                                           both sides.


                                                 ftwx621036


                                                                                                        Page 2085
   2080   2081   2082   2083   2084   2085   2086   2087   2088   2089   2090