
Page 213 - Divyank Tyagi
P. 213
|
managing WorkFloW WiTh WorkseTs 179
The second location is in the status bar at the bottom of the application (Figure 5.20). The
drop-down menu on the left serves the same function as the Active Workset drop-down in the
Collaborate tab, but it allows you to verify that the proper workset is active without the need to
bounce between tabs in the ribbon and interrupt your workflow. From this location you can also
change the active workset and even open the Worksets dialog box using the small button to the
left of the drop-down menu.
Figure 5.20
setting the active
workset in the
status bar
Another helpful tool located on the Collaborate tab is the Gray Inactive Worksets button. This
dims all the elements that aren’t on the active workset, helping you identify what elements are
in your current, active workset. This is a temporary view state and will not affect any printing
or other output.
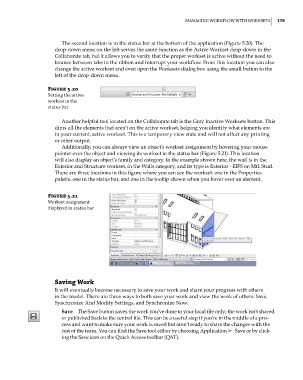
Additionally, you can always view an object’s workset assignment by hovering your mouse
pointer over the object and viewing its workset in the status bar (Figure 5.21). This location
will also display an object’s family and category. In the example shown here, the wall is in the
Exterior and Structure workset, in the Walls category, and its type is Exterior - EIFS on Mtl. Stud.
There are three locations in this figure where you can see the workset: one in the Properties
palette, one in the status bar, and one in the tooltip shown when you hover over an element.
Figure 5.21
Workset assignment
displayed in status bar
Saving Work
It will eventually become necessary to save your work and share your progress with others
in the model. There are three ways to both save your work and view the work of others: Save,
Synchronize And Modify Settings, and Synchronize Now.
Save The Save button saves the work you’ve done to your local file only; the work isn’t shared
or published back to the central file. This can be a useful step if you’re in the middle of a pro-
cess and want to make sure your work is saved but aren’t ready to share the changes with the
rest of the team. You can find the Save tool either by choosing Application ➢◆ Save or by click-
ing the Save icon on the Quick Access toolbar (QAT).
c05.indd 179 05-05-2014 16:44:32