
Page 421 - Divyank Tyagi
P. 421
|
Creating and using grouPs 387
Moving the insertion point is an easy matter of dragging (and, if necessary, rotating) the
Insertion Point icon to a common location before swapping one group for another (Figure 10.43).
Drag the insertion points for both Group 1 and Group 2 to the inside face of the walls at the
lower-left corner.
Figure 10.43
relocating
insertion points
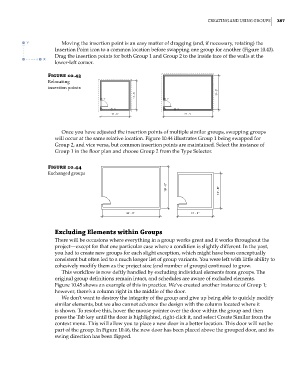
Once you have adjusted the insertion points of multiple similar groups, swapping groups
will occur at the same relative location. Figure 10.44 illustrates Group 1 being swapped for
Group 2, and vice versa, but common insertion points are maintained. Select the instance of
Group 1 in the floor plan and choose Group 2 from the Type Selector.
Figure 10.44
exchanged groups
excluding elements within Groups
There will be occasions where everything in a group works great and it works throughout the
project—except for that one particular case where a condition is slightly different. In the past,
you had to create new groups for each slight exception, which might have been conceptually
consistent but often led to a much longer list of group variants. You were left with little ability to
cohesively modify them as the project size (and number of groups) continued to grow.
This workflow is now deftly handled by excluding individual elements from groups. The
original group definitions remain intact, and schedules are aware of excluded elements.
Figure 10.45 shows an example of this in practice. We’ve created another instance of Group 1;
however, there’s a column right in the middle of the door.
We don’t want to destroy the integrity of the group and give up being able to quickly modify
similar elements, but we also cannot advance the design with the column located where it
is shown. To resolve this, hover the mouse pointer over the door within the group and then
press the Tab key until the door is highlighted, right-click it, and select Create Similar from the
context menu. This will allow you to place a new door in a better location. This door will not be
part of the group. In Figure 10.46, the new door has been placed above the grouped door, and its
swing direction has been flipped.
c10.indd 387 5/3/2014 11:04:53 AM