
Page 484 - Divyank Tyagi
P. 484
450 | ChaptER 11 Visualization
6. Activate the plan view of Level 1, and then click the Close Hidden Windows button
from the Quick Access toolbar. Activate the walkthrough, and then tile those views by
pressing WT on the keyboard. Press ZA on the keyboard to activate the Zoom All To Fit
command.
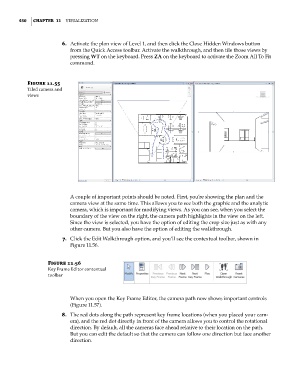
Figure 11.55
tiled camera and
views
A couple of important points should be noted. First, you’re showing the plan and the
camera view at the same time. This allows you to see both the graphic and the analytic
camera, which is important for modifying views. As you can see, when you select the
boundary of the view on the right, the camera path highlights in the view on the left.
Since the view is selected, you have the option of editing the crop size just as with any
other camera. But you also have the option of editing the walkthrough.
7. Click the Edit Walkthrough option, and you’ll see the contextual toolbar, shown in
Figure 11.56.
Figure 11.56
Key Frame editor contextual
toolbar
When you open the Key Frame Editor, the camera path now shows important controls
(Figure 11.57).
8. The red dots along the path represent key frame locations (when you placed your cam-
era), and the red dot directly in front of the camera allows you to control the rotational
direction. By default, all the cameras face ahead relative to their location on the path.
But you can edit the default so that the camera can follow one direction but face another
direction.
c11.indd 450 5/3/2014 11:07:18 AM