
Page 495 - Divyank Tyagi
P. 495
|
unDeRstanDing PHoto-RealistiC Visualization 461
The reason we’re using Printer as the Output setting is that 300 dpi is sufficient for printing
this page. And an 8” (200 mm) wide image will suffice for the anticipated width of this book.
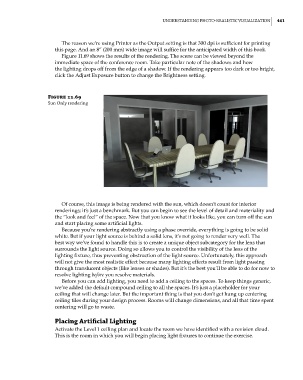
Figure 11.69 shows the results of the rendering. The scene can be viewed beyond the
immediate space of the conference room. Take particular note of the shadows and how
the lighting drops off from the edge of a shadow. If the rendering appears too dark or too bright,
click the Adjust Exposure button to change the Brightness setting.
Figure 11.69
sun only rendering
Of course, this image is being rendered with the sun, which doesn’t count for interior
renderings; it’s just a benchmark. But you can begin to see the level of detail and materiality and
the “look and feel” of the space. Now that you know what it looks like, you can turn off the sun
and start placing some artificial lights.
Because you’re rendering abstractly using a phase override, everything is going to be solid
white. But if your light source is behind a solid lens, it’s not going to render very well. The
best way we’ve found to handle this is to create a unique object subcategory for the lens that
surrounds the light source. Doing so allows you to control the visibility of the lens of the
lighting fixture, thus preventing obstruction of the light source. Unfortunately, this approach
will not give the most realistic effect because many lighting effects result from light passing
through translucent objects (like lenses or shades). But it’s the best you’ll be able to do for now to
resolve lighting before you resolve materials.
Before you can add lighting, you need to add a ceiling to the spaces. To keep things generic,
we’ve added the default compound ceiling to all the spaces. It’s just a placeholder for your
ceiling that will change later. But the important thing is that you don’t get hung up centering
ceiling tiles during your design process. Rooms will change dimensions, and all that time spent
centering will go to waste.
placing artificial Lighting
Activate the Level 1 ceiling plan and locate the room we have identified with a revision cloud.
This is the room in which you will begin placing light fixtures to continue the exercise.
c11.indd 461 5/3/2014 11:07:30 AM