
Page 535 - Divyank Tyagi
P. 535
|
Creating staCked Walls 501
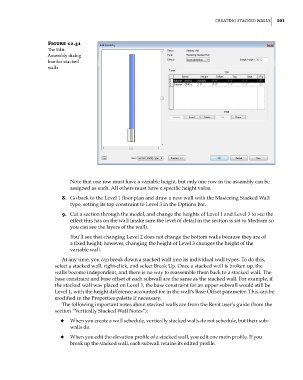
Figure 12.31
The edit
assembly dialog
box for stacked
walls
Note that one row must have a variable height, but only one row in the assembly can be
assigned as such. All others must have a specific height value.
8. Go back to the Level 1 floor plan and draw a new wall with the Mastering Stacked Wall
type, setting its top constraint to Level 3 in the Options bar.
9. Cut a section through the model, and change the heights of Level 1 and Level 3 to see the
effect this has on the wall (make sure the level of detail in the section is set to Medium so
you can see the layers of the wall).
You’ll see that changing Level 2 does not change the bottom walls because they are of
a fixed height; however, changing the height of Level 3 changes the height of the
variable wall.
At any time, you can break down a stacked wall into its individual wall types. To do this,
select a stacked wall, right-click, and select Break Up. Once a stacked wall is broken up, the
walls become independent, and there is no way to reassemble them back to a stacked wall. The
base constraint and base offset of each subwall are the same as the stacked wall. For example, if
the stacked wall was placed on Level 1, the base constraint for an upper subwall would still be
Level 1, with the height difference accounted for in the wall’s Base Offset parameter. This can be
modified in the Properties palette if necessary.
The following important notes about stacked walls are from the Revit user’s guide (from the
section “Vertically Stacked Wall Notes”):
◆ When you create a wall schedule, vertically stacked walls do not schedule, but their sub-
walls do.
◆ When you edit the elevation profile of a stacked wall, you edit one main profile. If you
break up the stacked wall, each subwall retains its edited profile.
c12.indd 501 5/3/2014 11:12:50 AM