
Page 847 - Divyank Tyagi
P. 847
|
MoDeling For ConstruCtion 813
8. Click the green check mark in the contextual ribbon to finish the sketch, and then click it
again to finish the part-dividing mode.
9. Activate the Parts Model view, and orbit the model so you can select the inside face of the
wall. Select the part of the wall that would represent the gypsum wall board at the inte-
rior face of Level 2.
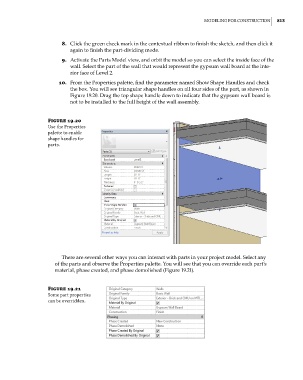
10. From the Properties palette, find the parameter named Show Shape Handles and check
the box. You will see triangular shape handles on all four sides of the part, as shown in
Figure 19.20. Drag the top shape handle down to indicate that the gypsum wall board is
not to be installed to the full height of the wall assembly.
Figure 19.20
use the Properties
palette to enable
shape handles for
parts.
There are several other ways you can interact with parts in your project model. Select any
of the parts and observe the Properties palette. You will see that you can override each part’s
material, phase created, and phase demolished (Figure 19.21).
Figure 19.21
some part properties
can be overridden.
c19.indd 813 05-05-2014 16:22:44