
Page 114 - Photoshop for Lightroom Users – Scott Kelby 2nd Edition
P. 114
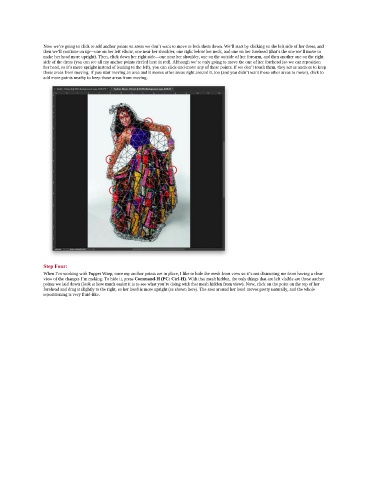
Now we’re going to click to add anchor points on areas we don’t want to move to lock them down. We’ll start by clicking on the left side of her dress, and
               then we’ll continue on up—one on her left elbow, one near her shoulder, one right below her neck, and one on her forehead (that’s the one we’ll move to
               make her head more upright). Then, click down her right side—one near her shoulder, one on the outside of her forearm, and then another one on the right
               side of the dress (you can see all my anchor points circled here in red). Although we’re only going to move the one of her forehead (so we can reposition
               her head, so it’s more upright instead of leaning to the left), you can click-and-move any of these points. If we don’t touch them, they act as anchors to keep
               those areas from moving. If you start moving an area and it moves other areas right around it, too (and you didn’t want those other areas to move), click to
               add more points nearby to keep those areas from moving.


               Step Four:
               When I’m working with Puppet Warp, once my anchor points are in place, I like to hide the mesh from view so it’s not distracting me from having a clear
               view of the changes I’m making. To hide it, press Command-H (PC: Ctrl-H). With that mesh hidden, the only things that are left visible are those anchor
               points we laid down (look at how much easier it is to see what you’re doing with that mesh hidden from view). Now, click on the point on the top of her
               forehead and drag it slightly to the right, so her head is more upright (as shown here). The area around her head moves pretty naturally, and the whole
               repositioning is very fluid-like.