
Page 193 - Photoshop for Lightroom Users – Scott Kelby 2nd Edition
P. 193
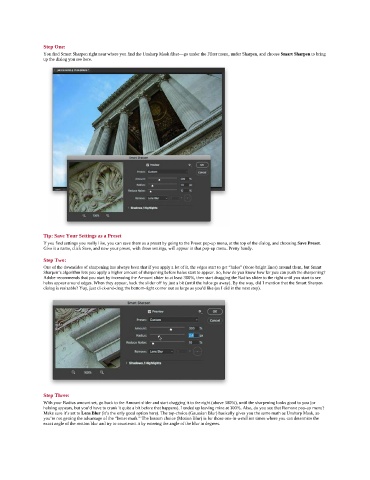
Step One:
               You find Smart Sharpen right near where you find the Unsharp Mask filter—go under the Filter menu, under Sharpen, and choose Smart Sharpen to bring
               up the dialog you see here.


               Tip: Save Your Settings as a Preset
               If you find settings you really like, you can save them as a preset by going to the Preset pop-up menu, at the top of the dialog, and choosing Save Preset.
               Give it a name, click Save, and now your preset, with those settings, will appear in that pop-up menu. Pretty handy.
               Step Two:
               One of the downsides of sharpening has always been that if you apply a lot of it, the edges start to get “halos” (those bright lines) around them, but Smart
               Sharpen’s algorithm lets you apply a higher amount of sharpening before halos start to appear. So, how do you know how far you can push the sharpening?
               Adobe recommends that you start by increasing the Amount slider to at least 300%, then start dragging the Radius slider to the right until you start to see
               halos appear around edges. When they appear, back the slider off by just a bit (until the halos go away). By the way, did I mention that the Smart Sharpen
               dialog is resizable? Yup, just click-and-drag the bottom-right corner out as large as you’d like (as I did in the next step).


               Step Three:
               With your Radius amount set, go back to the Amount slider and start dragging it to the right (above 300%), until the sharpening looks good to you (or
               haloing appears, but you’d have to crank it quite a bit before that happens). I ended up leaving mine at 300%. Also, do you see that Remove pop-up menu?
               Make sure it’s set to Lens Blur (it’s the only good option here). The top choice (Gaussian Blur) basically gives you the same math as Unsharp Mask, so
               you’re not getting the advantage of the “better math.” The bottom choice (Motion Blur) is for those one-in-a-million times where you can determine the
               exact angle of the motion blur and try to counteract it by entering the angle of the blur in degrees.