
Page 209 - Photoshop for Lightroom Users – Scott Kelby 2nd Edition
P. 209
Step Two:
Once your selection is in place, click inside the selected area and drag it to a clean area nearby (like you see here, where I’ve dragged the selection over to
the right—you can see the original selection on the left and a copy of that selection I’m dragging on the right). One of the best things about the Patch tool is
that, as you drag that selection, you see a live preview back in the originally selected area of what the “patch job” would look like if you released your
mouse button. This live preview makes it easy to pick a spot in your photo that would make a perfect fix. Try dragging it over to the bigger boat on the
right, and you’ll see what I mean—letting go of the mouse button when you have it over the boat would make a mess of your patch. By using that preview,
you’ll have no problem finding a great spot for your patch.
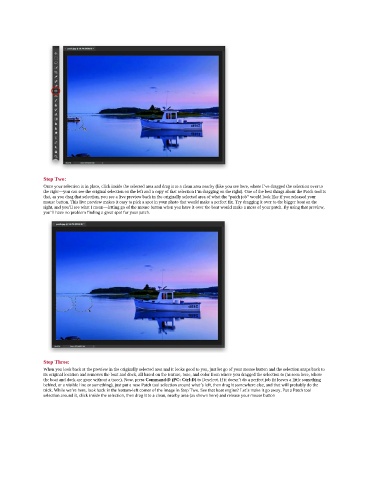
Step Three:
When you look back at the preview in the originally selected area and it looks good to you, just let go of your mouse button and the selection snaps back to
its original location and removes the boat and dock, all based on the texture, tone, and color from where you dragged the selection to (as seen here, where
the boat and dock are gone without a trace). Now, press Command-D (PC: Ctrl-D) to Deselect. If it doesn’t do a perfect job (it leaves a little something
behind, or a visible line or something), just put a new Patch tool selection around what’s left, then drag it somewhere else, and that will probably do the
trick. While we’re here, look back in the bottom-left corner of the image in Step Two. See that boat engine? Let’s make it go away. Put a Patch tool
selection around it, click inside the selection, then drag it to a clean, nearby area (as shown here) and release your mouse button