
Page 204 - Photoshop for Lightroom Users – Scott Kelby 2nd Edition
P. 204
Clone Stamp Tool: Cloning Over Distracting Stuff
Photoshop’s Clone Stamp tool is a workhorse of a tool—it fixes, covers up, copies, and removes all sorts of distracting things like magic. Have a photo of a
building with a broken window? You can clone a nearby window right over that broken one at a quality where no one would ever know it was fixed. Have
two light fixtures on a wall and wish there were three? Clone Stamp tool time. Want to patch a hole in a wall, or repair a torn edge of a photo, or pretty
much want to fix anything? There are few things this powerful little tool can’t do. It’s hard to believe it has been in Photoshop since version 1.0 (over 25
years ago), yet we still use the heck out of it.
Step One:
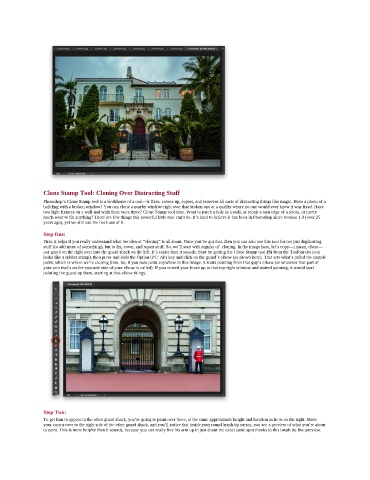
First, it helps if you really understand what the idea of “cloning” is all about. Once you’ve got that, then you can also use this tool for not just duplicating
stuff (to add more of something), but to fix, cover, and repair stuff. So, we’ll start with regular ol’ cloning. In the image here, let’s copy—I mean, clone—
our guard on the right over into the guard shack on the left. It’s easier than it sounds. Start by getting the Clone Stamp tool (S) from the Toolbar (its icon
looks like a rubber stamp), then press-and-hold the Option (PC: Alt) key and click on the guard’s elbow (as shown here). That sets what’s called the sample
point, which is where we’re cloning from. So, if you now paint anywhere in this image, it starts painting from that guy’s elbow (or whatever that part of
your arm that’s on the opposite side of your elbow is called). If you moved your brush up to that top-right window and started painting, it would start
painting the guard up there, starting at that elbow thingy.
Step Two:
To get him to appear in the other guard shack, you’re going to paint over there, at the same approximate height and location as he is on the right. Move
your cursor over to the right side of the other guard shack, and you’ll notice that inside your round brush tip cursor, you see a preview of what you’re about
to paint. This is more helpful than it sounds, because you can really line his arm up in just about the exact same spot thanks to this brush tip live preview.