Page 203 - Photoshop for Lightroom Users – Scott Kelby 2nd Edition
P. 203
Step Three:
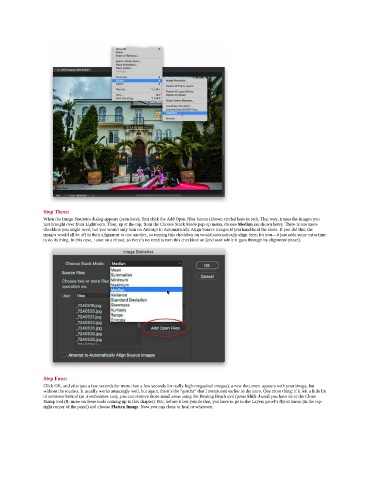
               When the Image Statistics dialog appears (seen here), first click the Add Open Files button (shown circled here in red). That way, it uses the images you
               just brought over from Lightroom. Then, up at the top, from the Choose Stack Mode pop-up menu, choose Median (as shown here). There is one more
               checkbox you might need, but you would only turn on Attempt to Automatically Align Source Images if you hand-held the shots. If you did this, the
               images would all be off in their alignment to one another, so turning this checkbox on would automatically align them for you—it just adds some extra time
               to do its thing. In this case, I shot on a tripod, so there’s no need to turn this checkbox on (and wait while it goes through its alignment phase).


               Step Four:
               Click OK, and after just a few seconds (or more than a few seconds for really high-megapixel images), a new document appears with your image, but
               without the tourists. It usually works amazingly well, but again, there’s the “gotcha” that I mentioned earlier in the intro. One more thing: if it left a little bit
               of someone behind (as it sometimes can), you can remove those small areas using the Healing Brush tool (press Shift-J until you have it) or the Clone
               Stamp tool (S; more on these tools coming up in this chapter). But, before it lets you do that, you have to go to the Layers panel’s flyout menu (in the top-
               right corner of the panel) and choose Flatten Image. Now you can clone or heal or whatever.

