Page 1135 - Kitab3DsMax
P. 1135
Chapter 45: Working with Advanced Lighting, Light Tracing, and Radiosity
                                             same Subdivision Size setting also can be found (and set globally) in the Radiosity Meshing Parameters roll-
                                             out of the Advanced Lighting panel. It is also found in the Advanced Lighting panel of the Object Properties
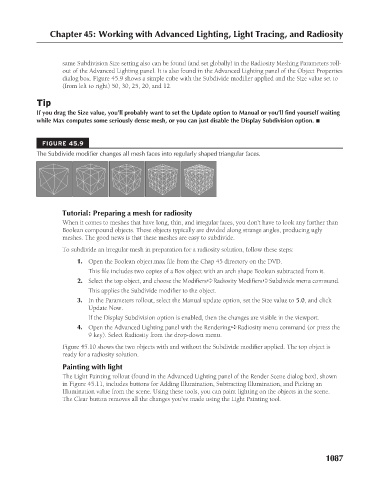
                                             dialog box. Figure 45.9 shows a simple cube with the Subdivide modifier applied and the Size value set to
                                             (from left to right) 50, 30, 25, 20, and 12.
                                     Tip
                                     If you drag the Size value, you’ll probably want to set the Update option to Manual or you’ll find yourself waiting
                                     while Max computes some seriously dense mesh, or you can just disable the Display Subdivision option. n
                                       FIGURE 45.9
                                     The Subdivide modifier changes all mesh faces into regularly shaped triangular faces.


                                             Tutorial: Preparing a mesh for radiosity
                                             When it comes to meshes that have long, thin, and irregular faces, you don’t have to look any further than
                                             Boolean compound objects. These objects typically are divided along strange angles, producing ugly
                                             meshes. The good news is that these meshes are easy to subdivide.
                                             To subdivide an irregular mesh in preparation for a radiosity solution, follow these steps:

                                                 1. Open the Boolean object.max file from the Chap 45 directory on the DVD.
                                                    This file includes two copies of a Box object with an arch shape Boolean subtracted from it.
                                                 2. Select the top object, and choose the Modifiers ➪ Radiosity Modifiers ➪ Subdivide menu command.
                                                    This applies the Subdivide modifier to the object.
                                                 3. In the Parameters rollout, select the Manual update option, set the Size value to 5.0, and click
                                                    Update Now.
                                                    If the Display Subdivision option is enabled, then the changes are visible in the viewport.
                                                 4. Open the Advanced Lighting panel with the Rendering ➪ Radiosity menu command (or press the
                                                    9 key). Select Radiosity from the drop-down menu.
                                             Figure 45.10 shows the two objects with and without the Subdivide modifier applied. The top object is
                                             ready for a radiosity solution.
                                             Painting with light
                                             The Light Painting rollout (found in the Advanced Lighting panel of the Render Scene dialog box), shown
                                             in Figure 45.11, includes buttons for Adding Illumination, Subtracting Illumination, and Picking an
                                             Illumination value from the scene. Using these tools, you can paint lighting on the objects in the scene.
                                             The Clear button removes all the changes you’ve made using the Light Painting tool.


                                                                                                                      1087

