
Page 1195 - Kitab3DsMax
P. 1195
4. In the File name section of the Render Output File dialog box, type the name of the first frame.
Max automatically numbers each frame for you. Choose a bitmap format from the Save as type list
(remember, an animation format will not work).
5. Click Save to close the Render Output File dialog box. (Some file formats might ask you for addi-
tional information for your files; if so, just click OK to accept the default options.) Back in the
Render Scene dialog box, Max displays the full path to the output directory.
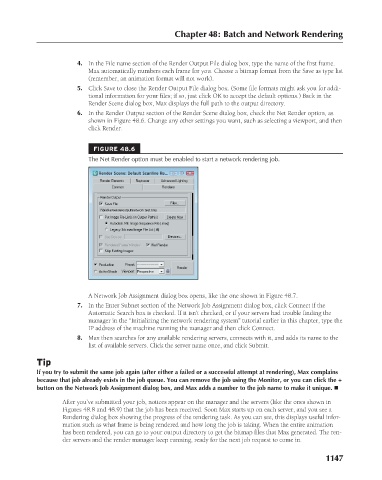
6. In the Render Output section of the Render Scene dialog box, check the Net Render option, as
shown in Figure 48.6. Change any other settings you want, such as selecting a viewport, and then
click Render. Chapter 48: Batch and Network Rendering
FIGURE 48.6
The Net Render option must be enabled to start a network rendering job.
A Network Job Assignment dialog box opens, like the one shown in Figure 48.7.
7. In the Enter Subnet section of the Network Job Assignment dialog box, click Connect if the
Automatic Search box is checked. If it isn’t checked, or if your servers had trouble finding the
manager in the “Initializing the network rendering system” tutorial earlier in this chapter, type the
IP address of the machine running the manager and then click Connect.
8. Max then searches for any available rendering servers, connects with it, and adds its name to the
list of available servers. Click the server name once, and click Submit.
Tip
If you try to submit the same job again (after either a failed or a successful attempt at rendering), Max complains
because that job already exists in the job queue. You can remove the job using the Monitor, or you can click the +
button on the Network Job Assignment dialog box, and Max adds a number to the job name to make it unique. n
After you’ve submitted your job, notices appear on the manager and the servers (like the ones shown in
Figures 48.8 and 48.9) that the job has been received. Soon Max starts up on each server, and you see a
Rendering dialog box showing the progress of the rendering task. As you can see, this displays useful infor-
mation such as what frame is being rendered and how long the job is taking. When the entire animation
has been rendered, you can go to your output directory to get the bitmap files that Max generated. The ren-
der servers and the render manager keep running, ready for the next job request to come in.
1147