
Page 127 - Kitab3DsMax
P. 127
Chapter 3: Working with Files, Importing, and Exporting
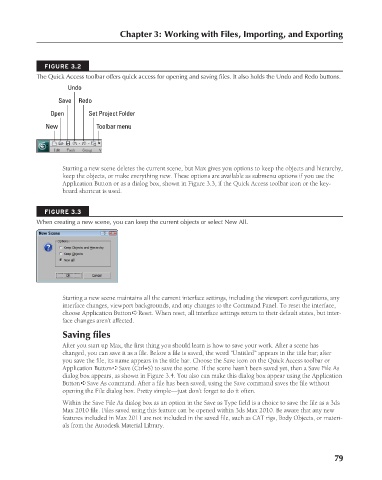
FIGURE 3.2
The Quick Access toolbar offers quick access for opening and saving files. It also holds the Undo and Redo buttons.
Undo
Save Redo
Open Set Project Folder
New Toolbar menu
Starting a new scene deletes the current scene, but Max gives you options to keep the objects and hierarchy,
keep the objects, or make everything new. These options are available as submenu options if you use the
Application Button or as a dialog box, shown in Figure 3.3, if the Quick Access toolbar icon or the key-
board shortcut is used.
FIGURE 3.3
When creating a new scene, you can keep the current objects or select New All.
Starting a new scene maintains all the current interface settings, including the viewport configurations, any
interface changes, viewport backgrounds, and any changes to the Command Panel. To reset the interface,
choose Application Button ➪ Reset. When reset, all interface settings return to their default states, but inter-
face changes aren’t affected.
Saving files
After you start up Max, the first thing you should learn is how to save your work. After a scene has
changed, you can save it as a file. Before a file is saved, the word “Untitled” appears in the title bar; after
you save the file, its name appears in the title bar. Choose the Save icon on the Quick Access toolbar or
Application Button ➪ Save (Ctrl+S) to save the scene. If the scene hasn’t been saved yet, then a Save File As
dialog box appears, as shown in Figure 3.4. You also can make this dialog box appear using the Application
Button ➪ Save As command. After a file has been saved, using the Save command saves the file without
opening the File dialog box. Pretty simple—just don’t forget to do it often.
Within the Save File As dialog box as an option in the Save as Type field is a choice to save the file as a 3ds
Max 2010 file. Files saved using this feature can be opened within 3ds Max 2010. Be aware that any new
features included in Max 2011 are not included in the saved file, such as CAT rigs, Body Objects, or materi-
als from the Autodesk Material Library.
79
6/30/10 3:34 PM
08_617779-ch03.indd 79
08_617779-ch03.indd 79 6/30/10 3:34 PM