Page 546 - Kitab3DsMax
P. 546
Part IV: Materials, Cameras, and Lighting Basics


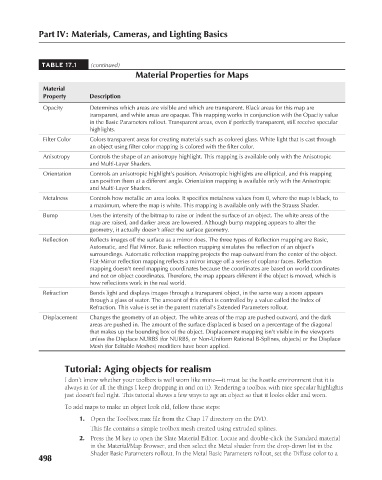
                     TABLE 17.1   (continued)
                                               Material Properties for Maps
                     Material
                     Property     Description
                     Opacity      Determines which areas are visible and which are transparent. Black areas for this map are
                                  transparent, and white areas are opaque. This mapping works in conjunction with the Opacity value
                                  in the Basic Parameters rollout. Transparent areas, even if perfectly transparent, still receive specular
                                  highlights.
                     Filter Color  Colors transparent areas for creating materials such as colored glass. White light that is cast through
                                  an object using filter color mapping is colored with the filter color.
                     Anisotropy   Controls the shape of an anisotropy highlight. This mapping is available only with the Anisotropic
                                  and Multi-Layer Shaders.
                     Orientation  Controls an anisotropic highlight’s position. Anisotropic highlights are elliptical, and this mapping
                                  can position them at a different angle. Orientation mapping is available only with the Anisotropic
                                  and Multi-Layer Shaders.
                     Metalness    Controls how metallic an area looks. It specifies metalness values from 0, where the map is black, to
                                  a maximum, where the map is white. This mapping is available only with the Strauss Shader.
                     Bump         Uses the intensity of the bitmap to raise or indent the surface of an object. The white areas of the
                                  map are raised, and darker areas are lowered. Although bump mapping appears to alter the
                                  geometry, it actually doesn’t affect the surface geometry.
                     Reflection   Reflects images off the surface as a mirror does. The three types of Reflection mapping are Basic,
                                  Automatic, and Flat Mirror. Basic reflection mapping simulates the reflection of an object’s
                                  surroundings. Automatic reflection mapping projects the map outward from the center of the object.
                                  Flat-Mirror reflection mapping reflects a mirror image off a series of coplanar faces. Reflection
                                  mapping doesn’t need mapping coordinates because the coordinates are based on world coordinates
                                  and not on object coordinates. Therefore, the map appears different if the object is moved, which is
                                  how reflections work in the real world.
                     Refraction   Bends light and displays images through a transparent object, in the same way a room appears
                                  through a glass of water. The amount of this effect is controlled by a value called the Index of
                                  Refraction. This value is set in the parent material’s Extended Parameters rollout.
                     Displacement  Changes the geometry of an object. The white areas of the map are pushed outward, and the dark
                                  areas are pushed in. The amount of the surface displaced is based on a percentage of the diagonal
                                  that makes up the bounding box of the object. Displacement mapping isn’t visible in the viewports
                                  unless the Displace NURBS (for NURBS, or Non-Uniform Rational B-Splines, objects) or the Displace
                                  Mesh (for Editable Meshes) modifiers have been applied.


                           Tutorial: Aging objects for realism
                           I don’t know whether your toolbox is well worn like mine—it must be the hostile environment that it is
                           always in (or all the things I keep dropping in and on it). Rendering a toolbox with nice specular highlights
                           just doesn’t feel right. This tutorial shows a few ways to age an object so that it looks older and worn.
                           To add maps to make an object look old, follow these steps:
                               1. Open the Toolbox.max file from the Chap 17 directory on the DVD.
                                   This file contains a simple toolbox mesh created using extruded splines.
                               2. Press the M key to open the Slate Material Editor. Locate and double-click the Standard material
                                  in the Material/Map Browser, and then select the Metal shader from the drop-down list in the
                                  Shader Basic Parameters rollout. In the Metal Basic Parameters rollout, set the Diffuse color to a
                    498


                                                                                                         6/30/10   4:25 PM
           25_617779-ch17.indd   498                                                                     6/30/10   4:25 PM
           25_617779-ch17.indd   498

