
Page 247 - Zoo Animal Learning and Training
P. 247
Chapter 12 Laboratory Skills 231
types of WBCs; blood cell morphology; WBC and platelet
count estimates; and examination for blood‐borne path-
ogens. The plasma proteins are proteins found in the
blood and the test is done using the refractometer. This
is the only test that an analyzer does not do. Whole blood
is sent through the analyzer where the various blood (a)
parameters are determined. Blood analyzers take less
time to determine the full CBC than doing it manually.
Some clinics will choose to send the blood to a refer-
ence laboratory because of costs and small volume of
samples run. CBCs sent to a reference laboratory require
the following the steps: (b)
1. Complete a requisition form using the patient file to
fill in the information.
2. Prepare the blood smear, do not stain it, package in
a slide container.
3. Place all the samples from the same patient in a (c)
Ziploc bag with the requisition form.
4. Put the bag in the refrigerator.
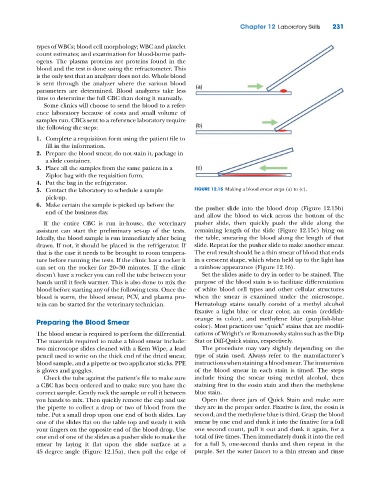
5. Contact the laboratory to schedule a sample FIGURE 12.15 Making a blood smear steps (a) to (c).
pick‐up.
6. Make certain the sample is picked up before the the pusher slide into the blood drop (Figure 12.15b)
end of the business day.
and allow the blood to wick across the bottom of the
If the entire CBC is run in‐house, the veterinary pusher slide, then quickly push the slide along the
assistant can start the preliminary set‐up of the tests. remaining length of the slide (Figure 12.15c) lying on
Ideally, the blood sample is run immediately after being the table, smearing the blood along the length of that
drawn. If not, it should be placed in the refrigerator. If slide. Repeat for the pusher slide to make another smear.
that is the case it needs to be brought to room tempera- The end result should be a thin smear of blood that ends
ture before running the tests. If the clinic has a rocker it in a crescent shape, which when held up to the light has
can set on the rocker for 20–30 minutes. If the clinic a rainbow appearance (Figure 12.16).
doesn’t have a rocker you can roll the tube between your Set the slides aside to dry in order to be stained. The
hands until it feels warmer. This is also done to mix the purpose of the blood stain is to facilitate differentiation
blood before starting any of the following tests. Once the of white blood cell types and other cellular structures
blood is warm, the blood smear, PCV, and plasma pro- when the smear is examined under the microscope.
tein can be started for the veterinary technician. Hematology stains usually consist of a methyl alcohol
fixative a light blue or clear color, an eosin (reddish‐
orange in color), and methylene blue (purplish‐blue
Preparing the Blood Smear
color). Most practices use “quick” stains that are modifi-
The blood smear is required to perform the differential. cations of Wright’s or Romanowsky stains such as the Dip
The materials required to make a blood smear include: Stat or Diff‐Quick stains, respectively.
two microscope slides cleaned with a Kem Wipe, a lead The procedure may vary slightly depending on the
pencil used to write on the thick end of the dried smear, type of stain used. Always refer to the manufacturer’s
blood sample, and a pipette or two applicator sticks. PPE instructions when staining a blood smear. The immersion
is gloves and goggles. of the blood smear in each stain is timed. The steps
Check the tube against the patient’s file to make sure include fixing the smear using methyl alcohol, then
a CBC has been ordered and to make sure you have the staining first in the eosin stain and then the methylene
correct sample. Gently rock the sample or roll it between blue stain.
you hands to mix. Then quickly remove the cap and use Open the three jars of Quick Stain and make sure
the pipette to collect a drop or two of blood from the they are in the proper order. Fixative is first, the eosin is
tube. Put a small drop upon one end of both slides. Lay second, and the methylene blue is third. Grasp the blood
one of the slides flat on the table top and steady it with smear by one end and dunk it into the fixative for a full
your fingers on the opposite end of the blood drop. Use one second count, pull it out and dunk it again, for a
one end of one of the slides as a pusher slide to make the total of five times. Then immediately dunk it into the red
smear by laying it flat upon the slide surface at a for a full 5, one-second dunks and then repeat in the
45 degree angle (Figure 12.15a), then pull the edge of purple. Set the water faucet to a thin stream and rinse