
Page 280 - Zoo Animal Learning and Training
P. 280
264 Tasks for the Veterinary Assistant
(a) (b) (c)
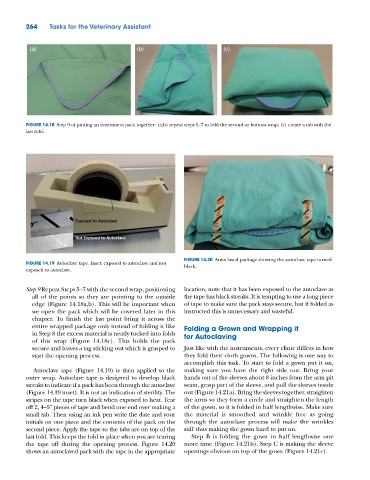
FIGURE 14.18 Step 9 of putting an instrument pack together: (a,b) repeat steps 5–7 to fold the second or bottom wrap; (c) create a tab with the
last fold.
FIGURE 14.20 Autoclaved package showing the autoclave tape turned
FIGURE 14.19 Autoclave tape. Inset: exposed to autoclave and not black.
exposed to autoclave.
Step 9 Repeat Steps 5–7 with the second wrap, positioning location, note that it has been exposed to the autoclave as
all of the points so they are pointing to the outside the tape has black streaks. It is tempting to use a long piece
edge (Figure 14.18a,b). This will be important when of tape to make sure the pack stays secure, but if folded as
we open the pack which will be covered later in this instructed this is unnecessary and wasteful.
chapter. To finish the last point bring it across the
entire wrapped package only instead of folding it like Folding a Grown and Wrapping it
in Step 8 the excess material is neatly tucked into folds for Autoclaving
of this wrap (Figure 14.18c). This holds the pack
secure and leaves a tag sticking out which is grasped to Just like with the instruments, every clinic differs in how
start the opening process. they fold their cloth gowns. The following is one way to
accomplish this task. To start to fold a gown put it on,
Autoclave tape (Figure 14.19) is then applied to the making sure you have the right side out. Bring your
outer wrap. Autoclave tape is designed to develop black hands out of the sleeves about 8 inches from the arm pit
streaks to indicate if a pack has been through the autoclave seam, grasp part of the sleeve, and pull the sleeves inside
(Figure 14.19 inset). It is not an indication of sterility. The out (Figure 14.21a). Bring the sleeves together, straighten
stripes on the tape turn black when exposed to heat. Tear the arms so they form a circle and straighten the length
off 2, 4–5” pieces of tape and bend one end over making a of the gown, so it is folded in half lengthwise. Make sure
small tab. Then using an ink pen write the date and your the material is smoothed and wrinkle free as going
initials on one piece and the contents of the pack on the through the autoclave process will make the wrinkles
second piece. Apply the tape so the tabs are on top of the stiff thus making the gown hard to put on.
last fold. This keeps the fold in place when you are tearing Step B is folding the gown in half lengthwise one
the tape off during the opening process. Figure 14.20 more time (Figure 14.21b). Step C is making the sleeve
shows an autoclaved pack with the tape in the appropriate openings obvious on top of the gown (Figure 14.21c).