
Page 662 - 2006 HARLEY FLSTCI SERVICE MANUAL
P. 662
2-13
s0482x2x
1 10 2006 Softail: Chassis
to 50-55 ft-lbs (67.8-74.6 Nm). ensures proper installation. into top hole on fork leg. (38.0-51.5 Nm). 11 7 4
Install the washer, lockwasher and left axle nut. Hold right side axle nut with wrench then tighten left axle nut See Figure 2-8. Tighten front slider cap screw to 11-15 ft- lbs (14.9-20.3 Nm) and then tighten rear slider cap screw to 11-15 ft-lbs (14.9-20.3 Nm). Using this sequence See Figure 2-7. Install the brake caliper to the fork legs. Loosely install long mounting bolt (1) (12 pt/10 mm) Install short mounting bolt (2) (12 pt/10 mm) into bottom hole on fork leg. Tighten bottom mounting bolt to 28-38 ft-lbs (38.0-51.5 Nm). Final tighten the top mounting bolt to 28-38 ft-lbs 11WARNING 1WARNING Whenever a wheel is installed and before moving
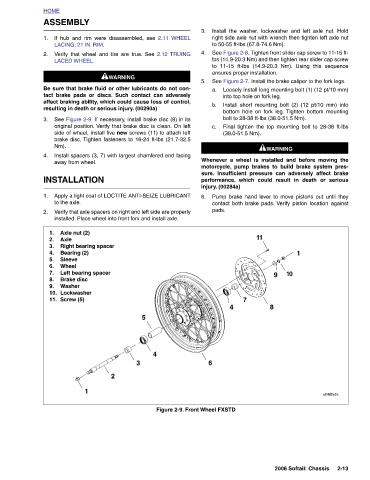
3. 4. 5. a. b. c. injury. (00284a) 6. pads. 6 Figure 2-9. Front Wheel FXSTD
2.11 WHEEL 5 4
If hub and rim were disassembled, see Verify that wheel and tire are true. See 2.12 TRUING 11WARNING 1WARNING Be sure that brake fluid or other lubricants do not con- tact brake pads or discs. Such contact can adversely affect braking ability, which could cause loss of control, resulting in death or serious injury. (00290a) See Figure 2-9. If necessary, install brake disc (8) in its original position. Verify that brake disc is clean. On left side of wheel, install five new screws (11) to attach left brake disc. Tighten fasteners to 16-24 ft-lbs (21.7-32.5 Install spacers (3, 7) with largest chamfered end facing Apply a light coat of LOCTITE AN
ASSEMBLY LACING: 21 IN. RIM. LACED WHEEL. Nm). away from wheel. INSTALLATION to the axle. Axle nut (2) Axle Bearing (2) Sleeve Wheel Left bearing spacer Brake disc Washer Lockwasher Screw (5)
HOME 1. 2. 3. 4. 1. 2. 1. 2. 3. 4. 5. 6. 7. 8. 9. 10. 11.