
Page 710 - 2006 HARLEY FLSTCI SERVICE MANUAL
P. 710
2.20 4 5 6 18 17 s0375x2x 2-61
2006 Softail: Chassis
7
16
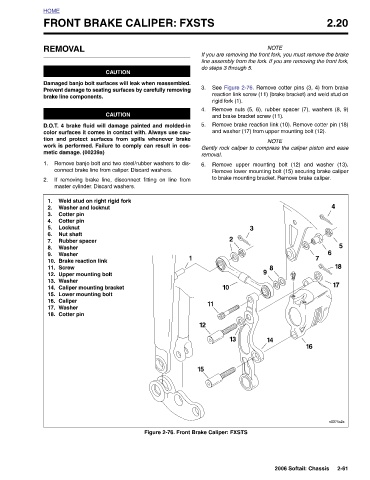
NOTE If you are removing the front fork, you must remove the brake line assembly from the fork. If you are removing the front fork, See Figure 2-76. Remove cotter pins (3, 4) from brake reaction link screw (11) (brake bracket) and weld stud on Remove nuts (5, 6), rubber spacer (7), washers (8, 9) Remove brake reaction link (10). Remove cotter pin (18) and washer (17) from upper mounting bolt (12). NOTE Gently rock caliper to compress the caliper piston and ease Remove upper mounting bolt (12) and washer (13). Remove lower mounting bolt (15) securing brake caliper to brake mounting bracket. Remove brake caliper. 3 8 9 14
do steps 3 through 5. rigid fork (1). and brake bracket screw (11). removal. 2 10 11 X 13
FRONT BRAKE CALIPER: FXSTS
5.
6.
3.
4.
1 12 15 Figure 2-76. Front Brake Caliper: FXSTS
CAUTION Damaged banjo bolt surfaces will leak when reassembled. Prevent damage to seating surfaces by carefully removing CAUTION D.O.T. 4 brake fluid will damage painted and molded-in color surfaces it comes in contact with. Always use cau- tion and protect surfaces from spills whenever brake work is performed. Failure to comply can result in cos- Remove banjo bolt and two steel/rubber washers to dis- connect brake line from caliper. Discard washers. If removing brake line, disconnect fitting on line from master cylinder. Discard washers. Weld stud on right rigid fork
REMOVAL brake line components. metic damage. (00239a) Washer and locknut Cotter pin Cotter pin Locknut Nut shaft Rubber spacer Washer Washer Brake reaction link Screw Upper mounting bolt Washer Caliper mounting bracket Lower mounting bolt Caliper Washer Cotter pin
HOME 1. 2. 1. 2. 3. 4. 5. 6. 7. 8. 9. 10. 11. 12. 13. 14. 15. 16. 17. 18.