
Page 191 - Womens Pavilion
P. 191
“Oil-Less” Scroll Medical Air
3.0 System Operation
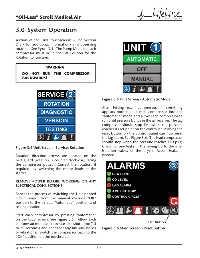
section of the Unit touchscreens - See Section
D.3.7 for additional information) and observing
rotation. See Figure 3.4. The Pump Mode for each
compressor must be in the Off Position for the
Rotation to function.
WARNING:
DO NOT RUN THE COMPRESSOR
BACKWARDS!
Figure 3.5 Unit Screen - Automatic Mode
After testing each compressor, if everything
appears normal, put each compressor into the
“Automatic” mode and allow each compressor to
run until pressure builds in the air receiver. The lag
compressor should stop fi rst when the pressure
reaches its set point on the controller. Pushing the
reset button on the control panel can now reset
the lag alarm. See Figure 3.6. The lead compressor
should stop when the pressure reaches 110 psig.
Figure 3.4 Unit Screen - Service: Rotation Check for any leaks in the piping up to the inlet
isolation valves of the dryers. Repair leaks, if
Rotation direction arrows are located on the needed.
belt guard (rotation is counter clockwise, facing
the compressor pulley). Correct the rotation, if
required, by switching the motor leads at the
starter.
REMOVE POWER BEFORE WORKING ON ANY
ELECTRICAL CONNECTIONS.
Repeat the process of switching the Unit printed
circuit boards from the manual override “Off ”
position to the default “Automatic” position and
testing rotation.
Start each compressor by pressing “Automatic”
on the touchscreen. See Figure 3.5. Allow each
compressor module to operate for a short time (15 Reset Button
to 30 seconds) and check for any unusual noises Figure 3.6 Main Screen - Reset Button
or vibrations. Switch the compressor back to the
“Off ” position on the touchscreen.
4107 9000 69.06 3-4