
Page 68 - Barbara Merry - The Splicing Handbook
P. 68
To keep splinters at bay and to help your rope from becoming snagged, sand
the entire jig and round the edges and corners slightly.
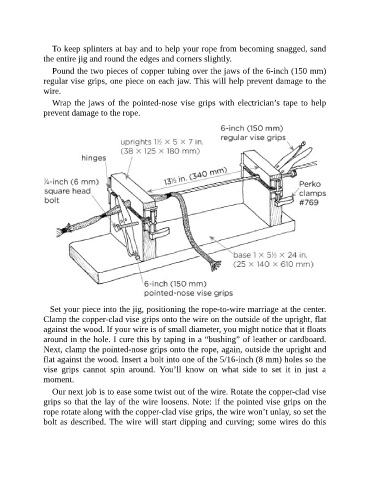
Pound the two pieces of copper tubing over the jaws of the 6-inch (150 mm)
regular vise grips, one piece on each jaw. This will help prevent damage to the
wire.
Wrap the jaws of the pointed-nose vise grips with electrician’s tape to help
prevent damage to the rope.
Set your piece into the jig, positioning the rope-to-wire marriage at the center.
Clamp the copper-clad vise grips onto the wire on the outside of the upright, flat
against the wood. If your wire is of small diameter, you might notice that it floats
around in the hole. I cure this by taping in a “bushing” of leather or cardboard.
Next, clamp the pointed-nose grips onto the rope, again, outside the upright and
flat against the wood. Insert a bolt into one of the 5/16-inch (8 mm) holes so the
vise grips cannot spin around. You’ll know on what side to set it in just a
moment.
Our next job is to ease some twist out of the wire. Rotate the copper-clad vise
grips so that the lay of the wire loosens. Note: if the pointed vise grips on the
rope rotate along with the copper-clad vise grips, the wire won’t unlay, so set the
bolt as described. The wire will start dipping and curving; some wires do this