
Page 78 - FreesStyler® Installation and Startup
P. 78
®
INSTALLATION AND STARTUP
Chapter 4 Frame and Carriage Assembly
Mounting the Entrance Arm Accessories
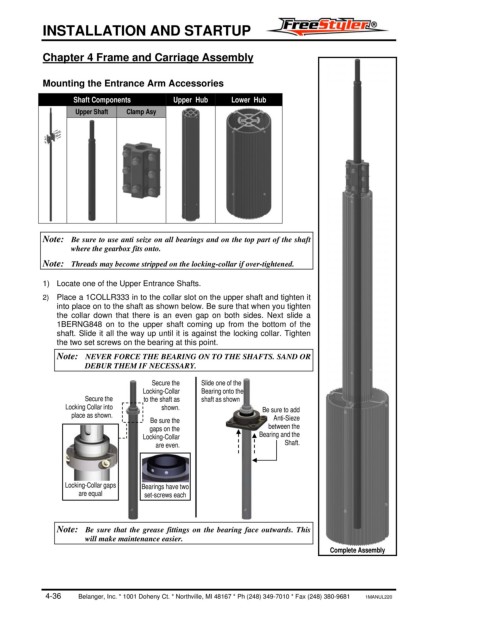
Shaft Components Upper Hub Lower Hub
Upper Shaft Clamp Asy
Note: Be sure to use anti seize on all bearings and on the top part of the shaft
where the gearbox fits onto.
Note: Threads may become stripped on the locking-collar if over-tightened.
1) Locate one of the Upper Entrance Shafts.
2) Place a 1COLLR333 in to the collar slot on the upper shaft and tighten it
into place on to the shaft as shown below. Be sure that when you tighten
the collar down that there is an even gap on both sides. Next slide a
1BERNG848 on to the upper shaft coming up from the bottom of the
shaft. Slide it all the way up until it is against the locking collar. Tighten
the two set screws on the bearing at this point.
Note: NEVER FORCE THE BEARING ON TO THE SHAFTS. SAND OR
DEBUR THEM IF NECESSARY.
Secure the Slide one of the
Locking-Collar Bearing onto the
Secure the to the shaft as shaft as shown
Locking Collar into shown. Be sure to add
place as shown.
Be sure the Anti-Sieze
gaps on the between the
Locking-Collar Bearing and the
are even. Shaft.
Locking-Collar gaps Bearings have two
are equal set-screws each
Note: Be sure that the grease fittings on the bearing face outwards. This
will make maintenance easier.
Complete Assembly
4-36 Belanger, Inc. * 1001 Doheny Ct. * Northville, MI 48167 * Ph (248) 349-7010 * Fax (248) 380-9681 1MANUL220