
Page 30 - DuraTrans XD® Conveyor
P. 30
DURATRANS XD® CONVEYOR
Installation
Assembling the Chain and Rollers
1) The Roller Assemblies must be installed “forward” as shown previously in Securing Chain
Links to Rollers.
2) All the nuts on the Roller Assemblies should be on the driver side, looking down as shown
previously in Securing Chain Links to Rollers.
3) Separate all of the chain into 10’-0” sections and find the location of each Roller Assembly to
verify that the Chain and Roller Assemblies shipped match the total ordered assembled chain
length.
4) Starting with a Roller Assembly, install one set of the X458 Side Plates and a Roller Pin on the
open side of the Roller Link, as shown previously in Securing Chain Links to Rollers.
5) Install a section of chain onto the exit end of that first Roller Assembly using the procedure
shown previously in Securing Chain Links to Rollers.
Note: A length of assembled chain, as shipped, may need to be separated in order to insert a
Roller Assembly in the correct location, as shown previously in Securing Chain Links to
Rollers.
Helpful Hint
Belanger® Standard Spacing
4’ Spacing Center to Center
7’ – 4” Spacing Center to Center
14’ Spacing Center to Center
Chain is shipped in 10 foot sections with no
Roller Assemblies installed. One link is 4” long.
6) Install the next Roller onto the end of the chain section as shown previously in Securing Chain
Links to Rollers.
7) Repeat steps 4, 5 and 6 until there is a section of completely assembled chain that is
approximately 10’-0”.
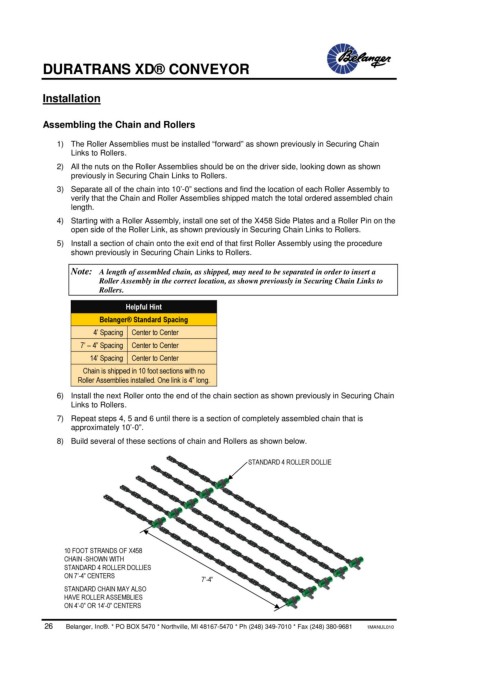
8) Build several of these sections of chain and Rollers as shown below.
STANDARD 4 ROLLER DOLLIE
10 FOOT STRANDS OF X458
CHAIN -SHOWN WITH
STANDARD 4 ROLLER DOLLIES
ON 7’-4” CENTERS
7’-4”
STANDARD CHAIN MAY ALSO
HAVE ROLLER ASSEMBLIES
ON 4’-0” OR 14’-0” CENTERS
26 Belanger, Inc®. * PO BOX 5470 * Northville, MI 48167-5470 * Ph (248) 349-7010 * Fax (248) 380-9681 1MANUL010