
Page 46 - 3D Artist 110 - 2017 UK
P. 46
RENDER A HIGH-POLY CHARACTER MODEL WITH KEYSHOT
04
Build to the camera angle At this point, it’s important
04 to decide on a inal camera perspective, and lock your
KeyShot project to it. This enables you to focus within
parameters, so that you can really push details where needed.
It’s critical to do more silhouette tests to ind the most
interesting composition, and to really prove out that the shapes
are strong and readable. During this stage, you can make
decisions to improve the composition by adding extra lenses to
the sides, adding wires to reinforce the shape of the body and
deciding where to focus on complex hardware intersections.
Set up materials in KeyShot Once you’re satisied with
05 the level of detail, it’s time to start material breakouts.
Generally, it’s a good idea to start with as few materials as
possible in order to maintain readability. For the Surgeon,
glossy, white plastic is the primary material for the hard-
surface pieces, with brushed nickel insets for attachments.
This is the same rough material breakout of a lot of modern-
day medical equipment, making these natural choices for the
primary materials. Dark rubber and steel are used on ilters,
wires and fasteners in order to add life to the emerging look,
which is still very sterile and ‘medical’. If there’s nothing to
offset the ultraclean materials, things begin to look like a
05 06
commercial render, which is not the intention here.
Add simple mesh detail As the Surgeon came
06 together in KeyShot, it was obvious that some of the
mechanical ilters on the mask were still lacking material
breakup and detail. KeyShot Bridge was used to export pieces
that needed additional detailing back into Maya. In the case of
the side ilters, simple geometry caps were built into the fronts,
as well as clamp details to transitions. The front ilter was
rebuilt to differentiate it from the smaller, ancillary ilters. The
simple meshes were imported into KeyShot as a single object
with multiple material IDs. The results look complex, when in
reality they were quick, inal touches. In some cases, selecting
components of pieces and assigning different material IDs
allows for material breakup without unnecessary modelling.
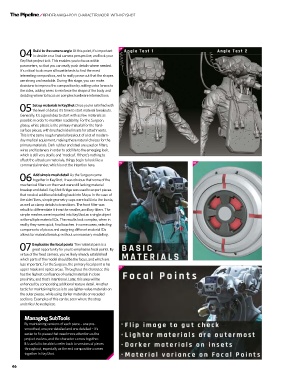
Emphasise the focal points The material pass is a
07 great opportunity for you to emphasise focal points. By
virtue of the ixed camera, you’ve likely already established
which parts of the model should be the focus, and which are
less important. For the Surgeon, the primary focal point is his
07
upper mask and optics areas. Throughout the character, this
has the highest conluence of varied materials in close
proximity, and that’s intentional. Later, this area will be
enhanced by compositing additional texture detail. Another
tactic for maintaining focus is to use lighter-value materials on
the outer pieces, while using darker materials on receded
sections. Examples of this can be seen where the strap
underlies the neckpiece.
Managing SubTools
By maintaining versions of each piece – one pre-
smoothed, one pre-detailed and one detailed – it’s
easier to ix pieces that need more attention as the
project evolves, and the character comes together.
It’s useful to be able to refer back to versions of pieces
throughout, especially as the end composition comes
together in KeyShot.
46