
Page 44 - 3D Artist 110 - 2017 UK
P. 44
Expert advice from industry professionals, taking you from concept to completion
All tutorial files can be downloaded from: filesilo.co.uk/3dartist
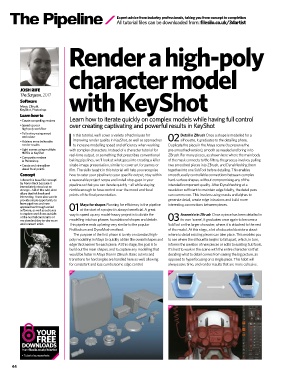
Render a high-poly
character model
JOSH RIFE
The Surgeon, 2017
Software with KeyShot
Maya, ZBrush,
KeyShot, Photoshop
Learn how to
• Create compelling renders Learn how to iterate quickly on complex models while having full control
• Speed up your over creating captivating and powerful results in KeyShot
high-poly worklow
• Tell a story using mood
and colour n this tutorial, we’ll cover a variety of techniques for Detail in ZBrush Once a shape is modelled for a
improving render quality in KeyShot, as well as approaches 02 silhouette, it graduates to the detailing phase.
• Achieve more believable
render results Ito increase modelling speed and eficiency when working Duplicate the piece in the Maya scene (to preserve the
• Light scenes using multiple with complex characters. Instead of a character tutorial for pre-smoothed version), smooth as needed and bring in to
HDRIs in KeyShot
real-time output, or something that prescribes conventional ZBrush. For many pieces, as shown here where the main body
• Composite renders
in Photoshop baking pipelines, we’ll look at what goes into creating a killer of the mask connects to the ilters, the process involves pulling
• Create and strengthen single-image presentation, similar to cover art for games or two smoothed pieces into ZBrush, and DynaMeshing them
visual focal points ilm. The skills taught in this tutorial will help you recognise together into one SubTool before detailing. This enables
Concept how to cater your pipeline to your speciic output, stay within smooth, easily controllable connections between complex
I chose this beautiful concept a reasonable project scope and install stop-gaps in your hard-surface shapes, without compromising any of the
by Aaron Beck because it pipeline so that you can iterate quickly – all while staying intended component quality. After DynaMeshing at a
immediately stood out as
strange – full of this odd, alien nimble enough to have control over the mood and focal resolution suficient to maintain edge idelity, the detail pass
allure that felt fresh and points of the inal presentation. can commence. This involves using masks and alphas to
interesting. It was also sure to
provide ample opportunity to generate detail, create edge intrusions and build more
learn pipelines and new Maya for shapes Planning for eficiency in the pipeline interesting connections between pieces.
approaches through varied
software, as well as a chance 01 at the start of a project is always beneicial. A great
to explore worklows outside way to speed up any model-heavy project is to divide the Assemble in ZBrush Once a piece has been detailed in
of the normal constraints of
my standard day-to-day as an modelling into two phases: foundational shapes and details. 03 its own ‘scene’, it graduates once again to become a
environment artist. This pipeline ends up being very similar to the popular SubTool on the larger character, where it is attached to the rest
ProBoolean and DynaMesh method. of the model. At this stage, a lot of educated decisions about
The purpose of the irst phase is to rely on standard high- where to detail existing pieces can take place. This enables you
poly modelling in Maya to quickly obtain the overall shapes and to see where the silhouette begins to fall apart, which, in turn,
edge thicknesses for each piece. At this stage, the goal is to informs the creation of new pieces or edits to existing SubTools.
build out the main shapes, and to capture any modelling that It’s best to work in the scene with the entire character so that
would be faster in Maya than in ZBrush. Basic cut-ins and deciding what to detail comes from seeing the big picture, as
transitions for hard angles are handled here as well, allowing opposed to hyperfocusing on a single piece. This habit will
for consistent and less cumbersome edge control. always save time, and render results that are more cohesive.
01 02
03
YoUR
FREE
DownloaDS
from ilesilo.co.uk/3dartist
• Tutorial screenshots
44