
Page 56 - 3D World - October 2017
P. 56
TuTorials
Simulate a Ghost Rider transformation
bAking the mAP
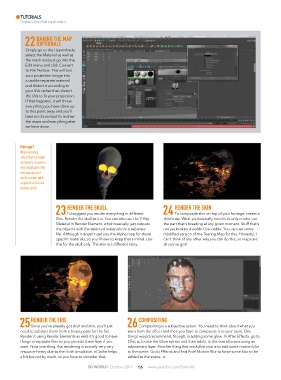
22 (oPtionAl)
Simply go to the Hypershade,
select the Material as well as
the mesh and just go into the
Edit menu and click Convert
to File Texture. This will turn
your projection image into
a usable separate material
and distort it according to
your UVs rather than distort
the UVs to fit your projection.
If that happens, it will throw
everything you have done up
to this point away and you’ll
have no choice but to redraw
the maps and everything else
we have done.
homage?
When recreating
effects that are known
and loved try to avoid a
direct duplication. Give
your own spin on it
and be creative, while
respectful of fans and
previous artists.
RenDeR the Skull RenDeR the Skin
23 I’d suggest you render everything in different 24 To composite skin on top of your footage, create a
files. Render the skull as it is. You can also use the V-Ray third map. What you basically need is to only render out
Material in Render Element, which basically just outputs the part that’s breaking at any given moment. Stuff that’s
the objects with the selected material into a separate not yet broken shouldn’t be visible. You can use some
file. Although it doesn’t get you the Alpha map for those modified version of the Tearing Map for this. Honestly, I
specific materials, so you’ll have to keep that in mind. Use can’t think of any other way you can do this, so maps are
this for the skull only. The skin is a different story… all you’ve got!
RenDeR the fiRe comPoSiting
25 Since you’ve already got skull and skin, you’ll just 26 Compositing is a subjective action. You need to think about what you
need to subtract them from a beauty pass for the fire. want from the effect and then you have to composite it to your taste. One
Render it using Render Elements as well, it’s good to have thing I would recommend, though, is adding some glow. In After Effects, go to
things in separate files so you can edit them later if you Effects, locate the Glow option and then add it to the overall scene using an
want. Now one thing, the rendering is actually very very adjustment layer. Another thing that would be nice is to add some motion blur
resource-heavy due to the cloth simulation. nCache helps to the scene. Go to Effects and find Pixel Motion Blur to force some blur to be
a bit but not by much, so you have to consider that. added to the scene.
3D WorlD October 2017 56 www.youtube.com/3dworld