
Page 29 - Indi-Reg User Guide
P. 29
RUMAS Indi-Reg Desktop User Guide
✓ The user can select some of the accounts to allocate by ticking the checkboxes or tick the first
checkbox to select all to allocate at once.
✓ After selecting the accounts to be allocated, the user must click on the “Allocate Jobcards” button
to create jobcards.
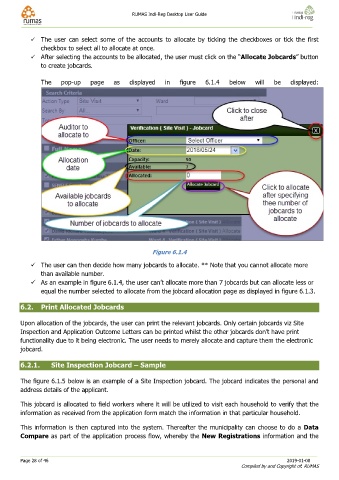
The pop-up page as displayed in figure 6.1.4 below will be displayed:
Figure 6.1.4
✓ The user can then decide how many jobcards to allocate. ** Note that you cannot allocate more
than available number.
✓ As an example in figure 6.1.4, the user can’t allocate more than 7 jobcards but can allocate less or
equal the number selected to allocate from the jobcard allocation page as displayed in figure 6.1.3.
6.2. Print Allocated Jobcards
Upon allocation of the jobcards, the user can print the relevant jobcards. Only certain jobcards viz Site
Inspection and Application Outcome Letters can be printed whilst the other jobcards don’t have print
functionality due to it being electronic. The user needs to merely allocate and capture them the electronic
jobcard.
6.2.1. Site Inspection Jobcard – Sample
The figure 6.1.5 below is an example of a Site Inspection jobcard. The jobcard indicates the personal and
address details of the applicant.
This jobcard is allocated to field workers where it will be utilized to visit each household to verify that the
information as received from the application form match the information in that particular household.
This information is then captured into the system. Thereafter the municipality can choose to do a Data
Compare as part of the application process flow, whereby the New Registrations information and the
Page 28 of 46 2019-01-08
Compiled by and Copyright of: RUMAS