
Page 707 - Divyank Tyagi
P. 707
|
Creating railingS 673
the Edit button to open the Edit Rails dialog box. This dialog box has rails that are spaced
6ʺ (150 mm) apart using the Circular Handrail profile. You want to change a few things
here. First, under the Profile heading, change the profile to Cable : Cable, which is the
railing profile you just created. You can do that by selecting Cable : Cable from the drop-
down menu. Do this for all of the profiles.
8. Next, you want to change the rail spacing from 6ʺ (150 mm) to 4ʺ (100 mm). Modify each
of the rails to show a 4ʺ (100 mm) increment. Your rails from bottom to top will read as
follows:
4ʺ (100 mm)
8ʺ (200 mm)
1ʹ-0ʺ (300 mm)
1ʹ-4ʺ (400 mm)
1ʹ-8ʺ (500 mm)
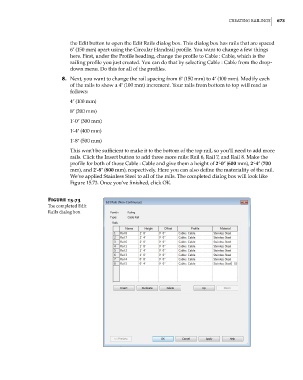
This won’t be sufficient to make it to the bottom of the top rail, so you’ll need to add more
rails. Click the Insert button to add three more rails: Rail 6, Rail 7, and Rail 8. Make the
profile for both of those Cable : Cable and give them a height of 2ʹ-0ʺ (600 mm), 2ʹ-4ʺ (700
mm), and 2ʹ-8ʺ (800 mm), respectively. Here you can also define the materiality of the rail.
We’ve applied Stainless Steel to all of the rails. The completed dialog box will look like
Figure 15.73. Once you’ve finished, click OK.
Figure 15.73
The completed edit
rails dialog box
c15.indd 673 5/3/2014 11:31:48 AM