
Page 703 - Divyank Tyagi
P. 703
|
Creating railingS 669
4. Press the Esc key or click Modify in the ribbon. Select the middle sketch segment, and in
the Options bar, change the Slope setting from By Host to Sloped. Select the last segment,
and in the Options bar, change the Height Correction to Custom and set the value to 4ʹ-0ʺ
(1200 mm).
5. Click the green check mark in the ribbon to finish the sketch, and you will notice that the
slope setting automatically adjusted the middle rail according to the height of the last
sketch segment.
You might notice that the balusters are extending all the way down to Level 1. That’s because
the Base parameter for the balusters in the railing type properties is usually set to Host. In the
absence of a host object such as a stair in the previous example, the host is the level. To adjust
the railing to accommodate this scenario, you would have to set the Base parameter relative to
one of the other rail elements and use a negative offset distance.
Where would you need to use these sketch segment options for railings? You can use them
to customize a railing that has been placed on a host. For example, you may need to continue a
railing from a stair run onto a flat landing. Let’s try this out in an exercise:
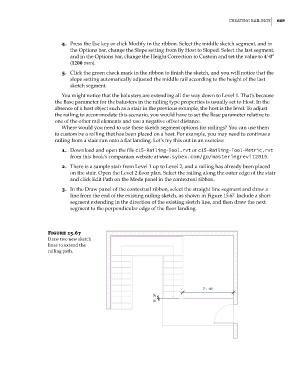
1. Download and open the file c15-Railing-Tool.rvt or c15-Railing-Tool-Metric.rvt
from this book’s companion website at www.sybex.com/go/masteringrevit2015.
2. There is a sample stair from Level 1 up to Level 2, and a railing has already been placed
on the stair. Open the Level 2 floor plan. Select the railing along the outer edge of the stair
and click Edit Path on the Mode panel in the contextual ribbon.
3. In the Draw panel of the contextual ribbon, select the straight line segment and draw a
line from the end of the existing railing sketch, as shown in Figure 15.67. Include a short
segment extending in the direction of the existing sketch line, and then draw the next
segment to the perpendicular edge of the floor landing.
Figure 15.67
draw two new sketch
lines to extend the
railing path.
c15.indd 669 5/3/2014 11:31:45 AM