
Page 52 - DP Vol 20 No 5_Neat
P. 52
CUTTING EDGE TECHNOLOGY
JOH HÄRICH, APPLICATION SPECIALIST AT EXOCAD, ON THE NEW TOOL
FOR REPAIRING PREPARATION MARGINS
With DentalCAD 3.2 Elefsina, users have
gained access to a completely new tool for
repairing preparation margins. In my opinion,
this tool is a major highlight because it allows
us to digitally repair a preparation margin—
an impressive enhancement. Like the entire
exocad software, this new tool is designed
around actual workflows and addresses a
key need in daily laboratory operations. The
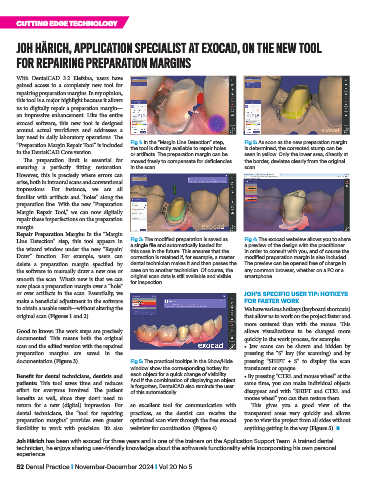
“Preparation Margin Repair Tool” is included Fig 1: In the “Margin Line Detection” step, Fig 2: As soon as the new preparation margin
is determined, the corrected stump can be
the tool is directly available to repair holes
in the DentalCAD Core version. or artifacts. The preparation margin can be seen in yellow. Only the lower area, directly at
The preparation limit is essential for moved freely to compensate for deficiencies the border, deviates clearly from the original
ensuring a perfectly fitting restoration. in the scan. scan.
However, this is precisely where errors can
arise, both in intraoral scans and conventional
impressions. For instance, we are all
familiar with artifacts and “holes” along the
preparation line. With the new “Preparation
Margin Repair Tool,” we can now digitally
repair these imperfections on the preparation
margin.
Repair Preparation Margin: In the “Margin
Line Detection” step, this tool appears in Fig 3: The modified preparation is saved as Fig 4: The exocad webview allows you to share
a single file and automatically loaded for
a preview of the design with the practitioner
the wizard window under the new “Repair/ this case in the future. This ensures that the in order to consult with you, and of course the
Draw” function. For example, users can correction is retained if, for example, a master modified preparation margin is also included.
delete a preparation margin specified by dental technician makes it and then passes the The preview can be opened free of charge in
the software to manually draw a new one or case on to another technician. Of course, the any common browser, whether on a PC or a
smooth the scan. What’s new is that we can original scan data is still available and visible smartphone.
for inspection.
now place a preparation margin over a “hole”
or over artifacts in the scan. Essentially, we JOH’S SPECIFIC USER TIP: HOTKEYS
make a beneficial adjustment in the software FOR FASTER WORK
to obtain a usable result—without altering the We have various hotkeys (keyboard shortcuts)
original scan (Figures 1 and 2). that allow us to work on the project faster and
more centered than with the mouse. This
Good to know: The work steps are precisely allows visualizations to be changed more
documented. This means both the original quickly in the work process, for example:
scan and the edited version with the repaired • Jaw scans can be shown and hidden by
preparation margins are saved in the pressing the “S” key (for scanning) and by
documentation (Figure 3). Fig 5: The practical tooltips in the Show/Hide pressing “SHIFT + S” to display the scan
window show the corresponding hotkey for translucent or opaque.
Benefit for dental technicians, dentists and each object for a quick change of visibility. • By pressing “CTRL and mouse wheel” at the
patients: This tool saves time and reduces And if the combination of displaying an object same time, you can make individual objects
is forgotten, DentalCAD also reminds the user
effort for everyone involved. The patient of this automatically. disappear and with “SHIFT and CTRL and
benefits as well, since they don’t need to mouse wheel” you can then restore them.
return for a new (digital) impression. For an excellent tool for communication with This gives you a good view of the
dental technicians, the “tool for repairing practices, as the dentist can receive the transparent areas very quickly and allows
preparation margins” provides even greater optimized scan view through the free exocad you to view the project from all sides without
flexibility to work with precision. It’s also webview for coordination. (Figure 4). anything getting in the way (Figure 5). n
Joh Härich has been with exocad for three years and is one of the trainers on the Application Support Team. A trained dental
technician, he enjoys sharing user-friendly knowledge about the software’s functionality while incorporating his own personal
experience.
52 Dental Practice I November-December 2024 I Vol 20 No 5