
Page 56 - DP Vol 20 No 5_Neat
P. 56
PROSTHETIC DENTISTRY SECTION
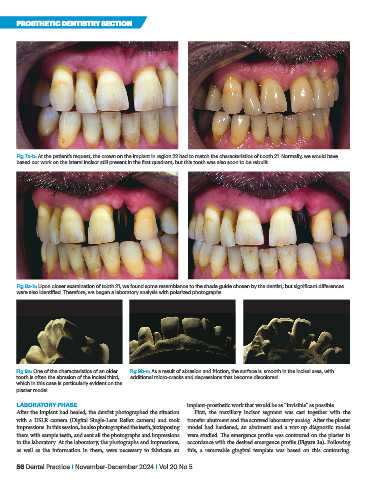
Fig 7a-b: At the patient’s request, the crown on the implant in region 22 had to match the characteristics of tooth 21. Normally, we would have
based our work on the lateral incisor still present in the first quadrant, but this tooth was also soon to be rebuilt.
Fig 8a-b: Upon closer examination of tooth 21, we found some resemblance to the shade guide chosen by the dentist, but significant differences
were also identified. Therefore, we began a laboratory analysis with polarized photographs.
Fig 9a: One of the characteristics of an older Fig 9b-c: As a result of abrasion and friction, the surface is smooth in the incisal area, with
tooth is often the abrasion of the incisal third, additional micro-cracks and depressions that become discolored.
which in this case is particularly evident on the
plaster model.
LABORATORY PHASE implant-prosthetic work that would be as “invisible” as possible.
After the implant had healed, the dentist photographed the situation First, the maxillary incisor segment was cast together with the
with a DSLR camera (Digital Single-Lens Reflex camera) and took transfer abutment and the screwed laboratory analog. After the plaster
impressions. In this session, he also photographed the teeth, juxtaposing model had hardened, an abutment and a wax-up diagnostic model
them with sample teeth, and sent all the photographs and impressions were studied. The emergence profile was contoured on the plaster in
to the laboratory. At the laboratory, the photographs and impressions, accordance with the desired emergence profile (Figure 3a). Following
as well as the information in them, were necessary to fabricate an this, a removable gingival template was based on this contouring.
56 Dental Practice I November-December 2024 I Vol 20 No 5