
Page 60 - DP Vol 20 No 5_Neat
P. 60
PROSTHETIC DENTISTRY SECTION
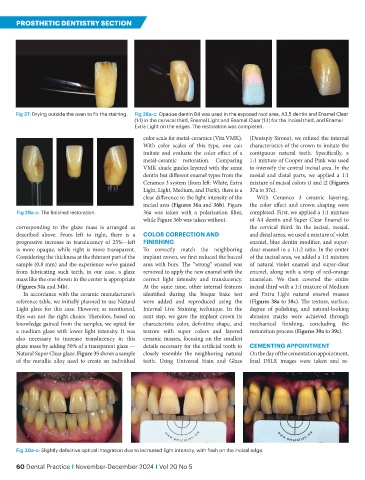
Fig 27: Drying outside the oven to fix the staining. Fig 28a-c: Opaque dentin B4 was used in the exposed root area, A3.5 dentin and Enamel Clear
(1:1) in the cervical third, Enamel Light and Enamel Clear (1:1) for the incisal third, and Enamel
Extra Light on the edges. The restoration was completed.
color scale for metal-ceramics (Vita VMK). (Dentsply Sirona), we refined the internal
With color scales of this type, one can characteristics of the crown to imitate the
imitate and evaluate the color effect of a contiguous natural teeth. Specifically, a
metal-ceramic restoration. Comparing 1:1 mixture of Cooper and Pink was used
VMK shade guides layered with the same to intensify the central incisal area. In the
dentin but different enamel types from the mesial and distal parts, we applied a 1:1
Ceramco 3 system (from left: White, Extra mixture of incisal colors i1 and i2 (Figures
Light, Light, Medium, and Dark), there is a 37a to 37c).
clear difference in the light intensity of the With Ceramco 3 ceramic layering,
incisal area (Figures 36a and 36b). Figure the color effect and crown shaping were
Fig 29a-c: The finished restoration. 36a was taken with a polarization filter, completed. First, we applied a 1:1 mixture
while Figure 36b was taken without. of A4 dentin and Super Clear Enamel to
corresponding to the glaze mass is arranged as the cervical third. In the incisal, mesial,
described above. From left to right, there is a COLOR CORRECTION AND and distal areas, we used a mixture of violet
progressive increase in translucency of 25%—left FINISHING enamel, blue dentin modifier, and super-
is more opaque, while right is more transparent. To correctly match the neighboring clear enamel in a 1:1:2 ratio. In the center
Considering the thickness at the thinnest part of the implant crown, we first reduced the buccal of the incisal area, we added a 1:1 mixture
sample (0.8 mm) and the experience we’ve gained area with burs. The “wrong” enamel was of natural violet enamel and super-clear
from fabricating such teeth, in our case, a glaze removed to apply the new enamel with the enamel, along with a strip of red-orange
mass like the one shown in the center is appropriate correct light intensity and translucency. mamelon. We then covered the entire
(Figures 34a and 34b). At the same time, other internal features incisal third with a 1:1 mixture of Medium
In accordance with the ceramic manufacturer’s identified during the bisque bake test and Extra Light natural enamel masses
reference table, we initially planned to use Natural were added and reproduced using the (Figures 38a to 38c). The texture, surface,
Light glaze for this case. However, as mentioned, Internal Live Staining technique. In the degree of polishing, and natural-looking
this was not the right choice. Therefore, based on next step, we gave the implant crown its abrasion marks were achieved through
knowledge gained from the samples, we opted for characteristic color, definitive shape, and mechanical finishing, concluding the
a medium glaze with lower light intensity. It was texture with super colors and layered restoration process (Figures 39a to 39c).
also necessary to increase translucency in this ceramic masses, focusing on the smallest
glaze mass by adding 50% of a transparent glaze — details necessary for the artificial tooth to CEMENTING APPOINTMENT
Natural Super Clear glaze. Figure 35 shows a sample closely resemble the neighboring natural On the day of the cementation appointment,
of the metallic alloy used to create an individual teeth. Using Universal Stain and Glaze final DSLR images were taken and re-
Fig 30a-c: Slightly defective optical integration due to increased light intensity, with flash on the incisal edge.
60 Dental Practice I November-December 2024 I Vol 20 No 5