
Page 57 - DP Vol 20 No 5_Neat
P. 57
of the central incisor 21, the tooth contiguous to it. Normally,
Hue Natural enamel Opal effect enamel Mamelon one would have oriented toward the lateral incisor still
i1 E xtra clear C lear opal Y ellow-orange present in the first quadrant, but unfortunately, its condition
i2 E xtra clear C lear opal Y ellow-orange was not ideal either, so it too would need to be reconstructed
i3 E xtra clear C lear opal Y ellow-orange (Figures 7a and 7b). Upon examining tooth 21 in detail, we
i4 W hite W hite opal Y ellow-orange noted some similarity to the teeth in the shade scale chosen
i5 W hite W hite opal Y ellow-orange
i6 W hite W hite opal Y ellow-orange by the dentist, but we also recognized relevant differences.
i7 W hite W hite opal Y ellow-orange Therefore, we began the laboratory analysis with polarized
i8 W hite W hite opal Y ellow-orange photographs (Figures 8a and 8b). Because the patient was 49
years old, we intentionally looked for specific features typical
A1 E xtra clear W hite opal Y ellow-orange of older, natural teeth and found what we were looking for.
A2 E xtra clear W hite opal Y ellow-orange
A3 C lear W hite opal R ed-orange CHARACTERISTICS OF OLDER TEETH
A3.5 C lear M edium opal R ed-orange • The dentin of young teeth is yellowish-white in color with
A4 C lear M edium opal R ed-orange a high brightness value. With age, the brightness decreases,
and the dentin becomes dark-yellowish-brown.
B1 E xtra clear W hite opal Y ellow-orange • The translucency of the enamel layer increases, which is
B2 E xtra clear C lear opal Y ellow-orange why the dentin and enamel-dentin boundary become more
B3 C lear C lear opal R ed-orange visible, resulting in a more pronounced color effect. At the
B4 C lear C lear opal R ed-orange same time, there is also a change in the opalescence effect,
from a light blue color, which is more opaque in a young
C1 C lear C lear opal Y ellow-orange
C2 C lear C lear opal Y ellow-orange tooth, to a darker red color that is more pronounced.
C3 M edium M edium opal R ed-orange • This color change results in “old” teeth having a darker
C4 D ark M edium opal R ed-orange shade and lower brightness value, but simultaneously an
increase in color saturation.
D2 E xtra clear C lear opal Y ellow-orange • The incisal third becomes abraded, further accentuating the
D3 C lear C lear opal Y ellow-orange visual characteristics of an “old” tooth. In the present case,
D4 M edium C lear opal R ed-orange this is particularly evident on the plaster model (Figure 9a).
• Due to abrasion and friction, the surface becomes polished
in the incisal area. This also creates microcracks and
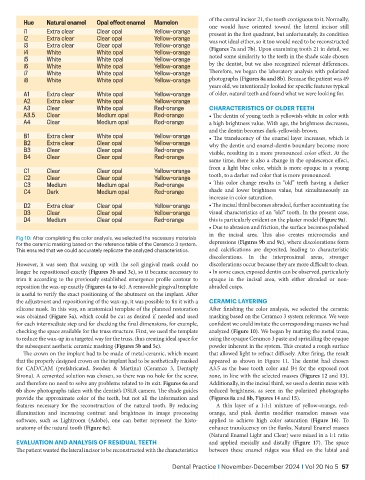
Fig 10: After completing the color analysis, we selected the necessary materials
for the ceramic masking based on the reference table of the Ceramco 3 system. depressions (Figures 9b and 9c), where discolorations form
This ensured that we could accurately replicate the analyzed characteristics. and calcifications are deposited, leading to characteristic
discolorations. In the interproximal areas, stronger
However, it was seen that waxing up with the soft gingival mask could no discolorations occur because they are more difficult to clean.
longer be repositioned exactly (Figures 3b and 3c), so it became necessary to • In some cases, exposed dentin can be observed, particularly
trim it according to the previously established emergence profile contour to opaque in the incisal area, with either abraded or non-
reposition the wax-up exactly (Figures 4a to 4c). A removable gingival template abraded cusps.
is useful to verify the exact positioning of the abutment on the implant. After
the adjustment and repositioning of the wax-up, it was possible to fix it with a CERAMIC LAYERING
silicone mask. In this way, an anatomical template of the planned restoration After finishing the color analysis, we selected the ceramic
was obtained (Figure 5a), which could be cut as desired if needed and used masking based on the Ceramco 3 system reference. We were
for each intermediate step and for checking the final dimensions, for example, confident we could imitate the corresponding masses we had
checking the space available for the truss structure. First, we used the template analyzed (Figure 10). We began by matting the metal truss,
to reduce the wax-up in a targeted way for the truss, thus creating ideal space for using the opaque Ceramco 3 paste and sprinkling the opaque
the subsequent aesthetic ceramic masking (Figures 5b and 5c). powder inherent in the system. This created a rough surface
The crown on the implant had to be made of metal-ceramic, which meant that allowed light to refract diffusely. After firing, the result
that the properly designed crown on the implant had to be aesthetically masked appeared as shown in Figure 11. The dentist had chosen
for CAD/CAM (prefabricated, Sweden & Martina) (Ceramco 3, Dentsply A3.5 as the base tooth color and B4 for the exposed root
Sirona). A cemented solution was chosen, so there was no hole for the screw, zone, in line with the selected masses (Figures 12 and 13).
and therefore no need to solve any problems related to its exit. Figures 6a and Additionally, in the incisal third, we used a dentin mass with
6b show photographs taken with the dentist’s DSLR camera. The shade guides reduced brightness, as seen in the polarized photographs
provide the approximate color of the teeth, but not all the information and (Figures 8a and 8b, Figures 14 and 15).
features necessary for the reconstruction of the natural tooth. By reducing A thin layer of a 1:1:1 mixture of yellow-orange, red-
illumination and increasing contrast and brightness in image processing orange, and pink dentin modifier mamelon masses was
software, such as Lightroom (Adobe), one can better represent the histo- applied to achieve high color saturation (Figure 16). To
anatomy of the natural tooth (Figure 6c). enhance translucency on the flanks, Natural Enamel masses
(Natural Enamel Light and Clear) were mixed in a 1:1 ratio
EVALUATION AND ANALYSIS OF RESIDUAL TEETH and applied mesially and distally (Figure 17). The space
The patient wanted the lateral incisor to be reconstructed with the characteristics between these enamel ridges was filled on the labial and
Dental Practice I November-December 2024 I Vol 20 No 5 57