
Page 55 - DP Vol 20 No 5_Neat
P. 55
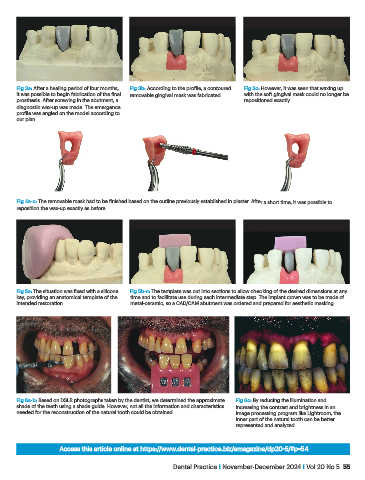
Fig 3a: After a healing period of four months,   Fig 3b: According to the profile, a contoured   Fig 3c: However, it was seen that waxing up
           it was possible to begin fabrication of the final   removable gingival mask was fabricated.   with the soft gingival mask could no longer be
           prosthesis. After screwing in the abutment, a                             repositioned exactly
           diagnostic wax-up was made. The emergence
           profile was angled on the model according to
           our plan.


           Fig 4a-c: The removable mask had to be finished based on the outline previously established in plaster. After a short time, it was possible to
           reposition the wax-up exactly as before.


           Fig 5a: The situation was fixed with a silicone   Fig 5b-c: The template was cut into sections to allow checking of the desired dimensions at any
           key, providing an anatomical template of the   time and to facilitate use during each intermediate step. The implant crown was to be made of
           intended restoration.                metal-ceramic, so a CAD/CAM abutment was ordered and prepared for aesthetic masking.


           Fig 6a-b: Based on DSLR photographs taken by the dentist, we determined the approximate   Fig 6c: By reducing the illumination and
           shade of the teeth using a shade guide. However, not all the information and characteristics   increasing the contrast and brightness in an
           needed for the reconstruction of the natural tooth could be obtained.  image processing program like Lightroom, the
                                                                                  inner part of the natural tooth can be better
                                                                                  represented and analyzed.


                         Access this article online at https://www.dental-practice.biz/emagazine/dp20-5/#p=54

                                                              Dental Practice I November-December 2024 I Vol 20 No 5  55