
Page 1111 - 2006 HARLEY FLSTCI SERVICE MANUAL
P. 1111
8.39 8 9
10
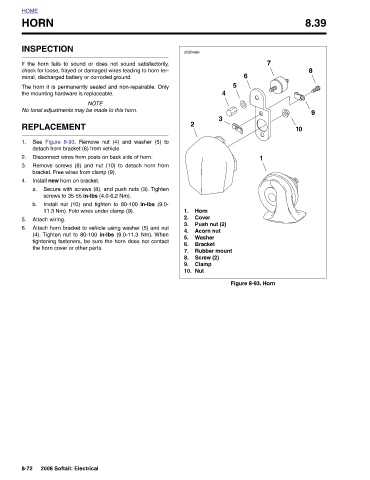
Figure 8-93. Horn
7
1
6
5
4
3 Rubber mount
Horn Cover Push nut (2) Acorn nut Washer Bracket Screw (2) Clamp Nut
d0324a8x 2 1. 2. 3. 4. 5. 6. 7. 8. 9. 10.
Remove nut (4) and washer (5) to Disconnect wires from posts on back side of horn. Remove screws (8) and nut (10) to detach horn from Secure with screws (8), and push nuts (3). Tighten screws to 35-55 in-lbs (4.0-6.2 Nm). Install nut (10) and tighten to 80-100 in-lbs (9.0- 11.3 Nm). Fold wires under clamp (9). Attach horn bracket to vehicle using washer (5) and nut (4). Tighten nut to 80-100 in-lbs (9.0-11.3 Nm). When tightening fasteners, be sure the horn does not contact
The horn it is permanently sealed and non-repairable. Only
check for loose, frayed or damaged wires leading to horn ter-
If the horn fails to sound or does not sound satisfactorily,
No tonal adjustments may be made to this horn.
minal, discharged battery or corroded ground.
NOTE
HOME HORN INSPECTION the mounting hardware is replaceable. REPLACEMENT Figure 8-93. See 1. detach horn bracket (6) from vehicle. 2. 3. bracket. Free wires from clamp (9). Install new horn on bracket. 4. a. b. Attach wiring. 5. 6. the horn cover or other parts. 2006 Softail: Electrical 8-72