
Page 55 - 3D Artist 110 - 2017 UK
P. 55
08
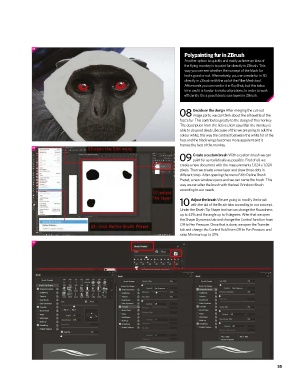
Polypainting fur in ZBrush
another option to quickly and easily achieve an idea of
the lying monkey is to paint fur directly in ZBrush. this
way you can see whether the concept of the black fur
looks good or not. alternatively, you can create fur in 3d
directly in ZBrush with the aid of the FiberMesh tool.
afterwards you can render it in Keyshot, but this takes
time and it is harder to make alterations. in order to work
eficiently it is a good idea to use layers in ZBrush.
Decide on the design after merging the cut-out
08 image parts, we can think about the silhouette of the
face’s fur. this contributes greatly to the design of the monkey.
the description from the ictive client says that the monkey is
able to do good deeds. Because of this we are going to add the
colour white; this way the contrast between the white fur of the
face and the black wings becomes more apparent and it
frames the face of the monkey.
09
Create a custom brush With a custom brush we can
09 paint fur as realistically as possible. First of all, we
create a new document with the measurements 1,024 x 1,024
pixels. then we create a new layer and draw three dots in
different sizes. after opening the menu edit>deine Brush
preset, a new window opens and we can name the brush. this
way we can alter the brush with the tool Window>Brush
according to our needs.
Adjust the brush We are going to modify the brush
10 with the aid of the Brush tabs according to our concept.
under the Brush tip shape tool we can change the roundness
up to 42% and the angle up to 9 degrees. after that we open
the shape dynamics tab and change the control function from
off to pen pressure. once that is done, we open the transfer
tab and change the control ield from off to pen pressure and
raise Minimum up to 31%.
10
55
55