
Page 57 - 3D Artist 110 - 2017 UK
P. 57
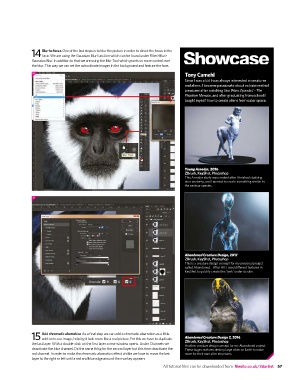
Blur to focus one of the last steps is to blur the picture in order to direct the focus to the
               14  face. We are using the Gaussian Blur function which can be found under Filter>Blur>
               Gaussian Blur. in addition to that we are using the Blur tool which grants us more control over
               the blur. this way we can set the subordinate images in the background and feature the face.
               14
                                                                                   Tony Camehl
                                                                                   Since I was a kid I was always interested in creatures
                                                                                   and aliens. I became passionate about extraterrestrial
                                                                                   creatures after watching Star Wars: Episode I – The
                                                                                   Phantom Menace, and after graduating from school I
                                                                                   taught myself how to create aliens from outer space.


                                                                                   Young Arnodyr, 2016
                                                                                   ZBrush, KeyShot, Photoshop
                                                                                   this arnodyr study was created after i inished studying
                                                                                   deer anatomy, and i wanted to create something similar to
                                                                                   the centaur species.

               15


                                                                                   Abandoned Creature Design, 2017
                                                                                   ZBrush, KeyShot, Photoshop
                                                                                   this is a creature design concept for my personal project
                                                                                   called abandoned – after all. i used different textures in
                                                                                   Keyshot to quickly create this ‘look’ under its skin.


                    Add chromatic aberration as a inal step we can add a chromatic aberration as a little
               15  add-on to our image, helping it look more like a real picture. For this we have to duplicate   Abandoned Creature Design 2, 2016
                                                                                   ZBrush, KeyShot, Photoshop
               the last layer. With a double-click on the irst layer a new window opens. under channels we
                                                                                   another creature design concept for my abandoned project.
               deactivate the blue channel. do the same thing for the second layer but this time deactivate the   these huge creatures destroy large cities on earth to make
               red channel. in order to make the chromatic aberration effect visible we have to move the last   room for their own alien structures.
               layer to the right or left until a red and blue edge around the monkey appears.
                                                                         All tutorial files can be downloaded from: filesilo.co.uk/3dartist  57