Page 1511 - Foton Workshop Manual - Auman EST-M
P. 1511

Electrical system – electrical components                 EL - 87

              Change                                                                                              IN

              1. Dismount the instrument panel assembly (refer to Chapter BW body-instrument panel, combination
              instrument, ashtray-instrument panel, replacement”)                                                 DI
              2.  Remove  the  instrument  panel  frame  (refer  to  “Chapter  BW  Vehicle  Body-  Instrument  Panel,
              Combination Instrument, Ashtray - Instrument panel frame, Replacement”)
                                                                                                                  EG
              3. Disconnect the plug & socket connectors of A/C blower, speed adjusting module, servo motor and

              other components connected to the A/C system
                                                                                                                  TR
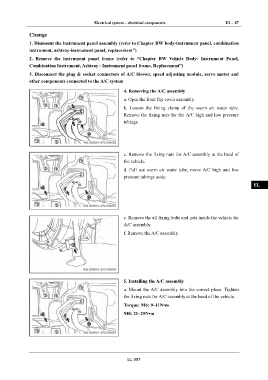
                                                        4. Removing the A/C assembly

                                                        a. Open the front flip cover assembly.
                                                                                                                  AX
                                                        b.  Loosen  the  fixing  clamp  of  the  warm  air  water  tube.

                                                        Remove the fixing nuts for the A/C high and low pressure
                                                                                                                  FR
                                                        tubings.


                                                                                                                  ST


                                                                                                                  BR
                                                        c. Remove the fixing nuts for A/C assembly at the head of
                                                        the vehicle.
                                                        d.  Pull  out  warm  air  water  tube,  move  A/C  high  and  low   BW
                                                        pressure tubings aside.

                                                                                                                  EL


                                                        e. Remove the all fixing bolts and nuts inside the vehicle for
                                                        A/C assembly.

                                                        f. Remove the A/C assembly.


                                                        5. Installing the A/C assembly

                                                        a. Mount the A/C assembly into the correct place. Tighten

                                                        the fixing nuts for A/C assembly at the head of the vehicle.

                                                        Torque: M6: 9~11N•m

                                                        M8: 21~25N•m


                                                          EL-087
   1506   1507   1508   1509   1510   1511   1512   1513   1514   1515   1516