
Page 117 - Divyank Tyagi
P. 117
|
ediTiNG eleMeNTs iNTeRacTively 83
2. Specify the Joint Gap distance in the Options bar. Note that this distance can only be set
between 1/16” (1.6 mm) and 1’-0” (300 mm).
3. Move the mouse pointer over a wall and click to place the gap.
Once you have successfully split a wall with a gap, select the wall and notice the constraints
(locks) on the gap and between the two parallel wall segments. Try to drag either of the wall
ends separated by the gap, and you will see that the gap distance is maintained. Try to move the
wall in a direction perpendicular to the wall segments, and you will notice that the two wall
segments remain aligned.
If you’d like to rejoin walls that have been split with a gap, follow these steps:
1. Select a wall split with a defined gap.
2. Click the constraint icon in the gap to unlock the dimension constraint.
3. Right-click the end grip of one wall segment and select Allow Join.
4. Select the other wall and repeat step 3.
5. Drag the wall end grip of one wall segment to the end of the other segment. The walls
should join.
Note that on walls with smaller gaps, the segments may automatically join as soon as you
select Allow Join; however, rejoined segments may not form a single segment. If you have
trouble joining two parallel wall segments into one, try to drag one of the wall ends away from
the other and release the mouse button; then drag the segment back to the other end.
Offsetting Lines and Walls
Certification Offset is similar to the Move and Copy tools in that it moves and makes a copy of an element
Objective by offsetting it parallel to an edge you select. You can find the Offset tool in the Modify tab of
the ribbon. You can also specify an offset distance as an option in the Options bar when you are
sketching lines or walls.
This tool is especially useful in the Family Editor when you’re making shapes that have a
consistent thickness in profile, such as extruded steel shapes. The Offset tool has a Copy option
available in the Options bar that determines whether the offsetting operation generates a copy
of the selected elements or simply moves them.
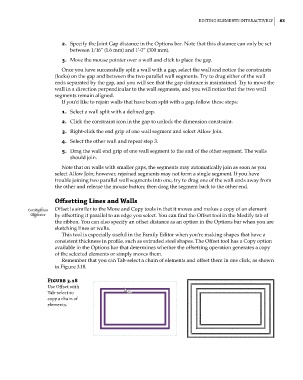
Remember that you can Tab-select a chain of elements and offset them in one click, as shown
in Figure 3.18.
Figure 3.18
Use offset with
Tab-select to
copy a chain of
elements.
c03.indd 83 5/3/2014 10:31:01 AM