
Page 279 - Divyank Tyagi
P. 279
|
usIng InserteD 3D Data 245
1. Open the file c07-Roof-by-Face.rvt and make sure you are in the 3D view named
00-Start.
2. On the Massing & Site tab, choose In-Place Mass and name it Rhino Roof.
3. Switch to the Insert tab and select Link CAD. Switch to filter your file type to *.sat and
navigate to the c07-Roof-Face.sat file downloaded from the book’s web page.
4. Set the placement options as follows:
◆ ◆ Positioning: Auto – Origin To Origin
◆ ◆ Place At: Level 1
◆ ◆ Import Units: Inch
5. Click Open to complete the link and close the dialog box, and then click the Finish Mass
button in the ribbon.
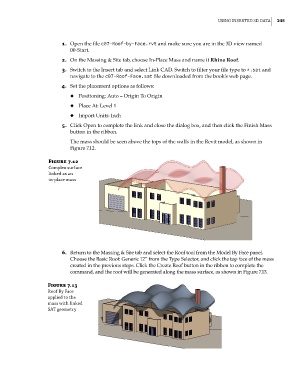
The mass should be seen above the tops of the walls in the Revit model, as shown in
Figure 7.12.
Figure 7.12
Complex surface
linked as an
in-place mass
6. Return to the Massing & Site tab and select the Roof tool from the Model By Face panel.
Choose the Basic Roof: Generic 12” from the Type Selector, and click the top face of the mass
created in the previous steps. Click the Create Roof button in the ribbon to complete the
command, and the roof will be generated along the mass surface, as shown in Figure 7.13.
Figure 7.13
roof by face
applied to the
mass with linked
sat geometry
c07.indd 245 5/3/2014 10:48:57 AM