
Page 444 - Divyank Tyagi
P. 444
410 | ChaPter 10 Working With Phasing, grouPs, and design oPtions
Scheduling
Now let’s create a schedule for walls that we will use to provide a volume-based cost for
demolition in each phase of the proposed work. As a side note, we believe it would be helpful
to be able to create multi-category schedules that would allow volume to be calculated from
various model categories at the same time. This is not presently possible, so we’ll create the
schedules individually.
First, you will need to create a phase filter to show only demolished elements. After you
create the new phase filter, you can apply it to any floor plan or 3D view to verify what the filter
will display. The same elements will be displayed in a schedule. To create the phase filter and
the wall demolition schedules, follow these steps:
1. From the Manage tab in the ribbon, click Phases. In the Phasing dialog box, switch to the
Phase Filters tab. Click the New button and name the new filter Demo Only. Set the New
and Existing column values in the table to Not Displayed, and then click OK to close the
dialog box.
2. Switch to the View tab in the ribbon, and from the Create panel choose Schedules ➢
Schedules/Quantities. In the New Schedule dialog box, set the following values and then
click OK:
◆ ◆ Category: Walls
◆ ◆ Name: Wall Demo Schedule - Phase 1
◆ ◆ Phase: New Construction - Phase 1
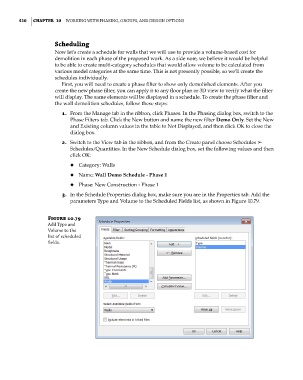
3. In the Schedule Properties dialog box, make sure you are in the Properties tab. Add the
parameters Type and Volume to the Scheduled Fields list, as shown in Figure 10.79.
Figure 10.79
add type and
Volume to the
list of scheduled
fields.
c10.indd 410 5/3/2014 11:05:06 AM