Page 22 - May
P. 22
METALWORKING EQUIPMENT AND TOOLS

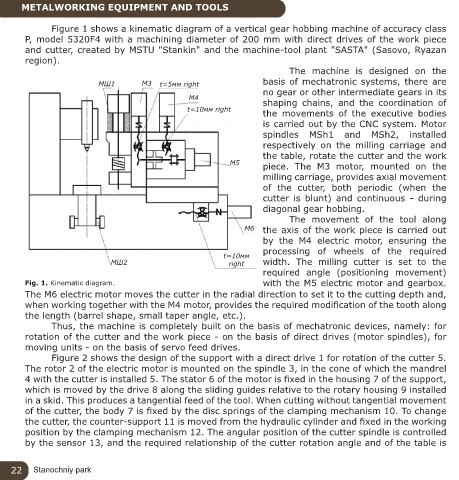
               Figure 1 shows a kinematic diagram of a vertical gear hobbing machine of accuracy class
        P, model 5320F4 with a machining diameter of 200 mm with direct drives of the work piece
        and cutter, created by MSTU "Stankin" and the machine-tool plant "SASTA" (Sasovo, Ryazan
        region).
                                                                                The  machine  is designed  on  the

                            МШ1         М3  t=5мм right                 basis of mechatronic systems, there are
                                                                        no gear or other intermediate gears in its
                                                    М4                  shaping  chains,  and  the  coordination  of
                                                    t=10мм right        the  movements  of  the  executive  bodies
                                                                        is carried out by the CNC system. Motor
                                                                        spindles MSh1  and  MSh2,  installed
                                                                        respectively  on  the  milling  carriage  and
                                                                        the table, rotate the cutter and the work
                                                               М5       piece.  The M3  motor, mounted  on  the
                                                                        milling carriage, provides axial movement
                                                                        of  the cutter, both periodic (when the
                                                                        cutter  is blunt)  and  continuous  -  during
                                                                        diagonal gear hobbing.
                                                                                The  movement  of  the  tool  along
                                                                   М6   the axis of the work piece is carried out
                                                                        by  the  M4  electric  motor,  ensuring  the
                                                                        processing  of  wheels  of  the  required
                                                              t=10мм
                               МШ2                             right    width. The  milling  cutter  is set  to  the
                                                                        required  angle (positioning movement)
        Fig. 1. Kinematic diagram.                                      with the M5 electric motor and gearbox.
        The M6 electric motor moves the cutter in the radial direction to set it to the cutting depth and,
        when working together with the M4 motor, provides the required modification of the tooth along
        the length (barrel shape, small taper angle, etc.).
               Thus, the machine is completely built on the basis of mechatronic devices, namely: for
        rotation of the cutter and the work piece - on the basis of direct drives (motor spindles), for
        moving units - on the basis of servo feed drives.
               Figure 2 shows the design of the support with a direct drive 1 for rotation of the cutter 5.
        The rotor 2 of the electric motor is mounted on the spindle 3, in the cone of which the mandrel
        4 with the cutter is installed 5. The stator 6 of the motor is fixed in the housing 7 of the support,
        which is moved by the drive 8 along the sliding guides relative to the rotary housing 9 installed
        in a skid. This produces a tangential feed of the tool. When cutting without tangential movement
        of the cutter, the body 7 is fixed by the disc springs of the clamping mechanism 10. To change
        the cutter, the counter-support 11 is moved from the hydraulic cylinder and fixed in the working
        position by the clamping mechanism 12. The angular position of the cutter spindle is controlled
        by the sensor 13, and the required relationship of the cutter rotation angle and of the table is


    22    Stanochniy park

