
Page 437 - Kitab3DsMax
P. 437
Chapter 13: Modeling with Polygons and Patches
Many of the features in the Geometry rollout work in the same way as the Vertex subobjects, but the
Geometry rollout also includes some features that are enabled in Edge subobject mode, like the ones in the
following sections.
Subdivide
You use the Subdivide button to increase the resolution of a patch. This is done by splitting an edge into
two separate edges, divided at the original edge’s center. To use this feature, select an edge or edges and
click the Subdivide button. The Propagate option causes the edges or neighboring patches to also be subdi-
vided. Using Subdivide without the Propagate option enabled can cause cracks to appear in the patch. The
Subdivide button also works in Patch subobject mode.
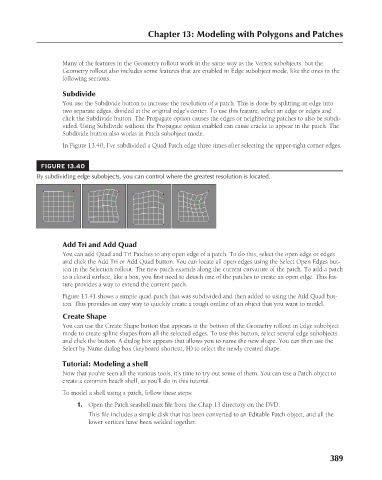
In Figure 13.40, I’ve subdivided a Quad Patch edge three times after selecting the upper-right corner edges.
FIGURE 13.40
By subdividing edge subobjects, you can control where the greatest resolution is located.
Add Tri and Add Quad
You can add Quad and Tri Patches to any open edge of a patch. To do this, select the open edge or edges
and click the Add Tri or Add Quad button. You can locate all open edges using the Select Open Edges but-
ton in the Selection rollout. The new patch extends along the current curvature of the patch. To add a patch
to a closed surface, like a box, you first need to detach one of the patches to create an open edge. This fea-
ture provides a way to extend the current patch.
Figure 13.41 shows a simple quad patch that was subdivided and then added to using the Add Quad but-
ton. This provides an easy way to quickly create a rough outline of an object that you want to model.
Create Shape
You can use the Create Shape button that appears at the bottom of the Geometry rollout in Edge subobject
mode to create spline shapes from all the selected edges. To use this button, select several edge subobjects
and click the button. A dialog box appears that allows you to name the new shape. You can then use the
Select by Name dialog box (keyboard shortcut, H) to select the newly created shape.
Tutorial: Modeling a shell
Now that you’ve seen all the various tools, it’s time to try out some of them. You can use a Patch object to
create a common beach shell, as you’ll do in this tutorial.
To model a shell using a patch, follow these steps:
1. Open the Patch seashell.max file from the Chap 13 directory on the DVD.
This file includes a simple disk that has been converted to an Editable Patch object, and all the
lower vertices have been welded together.
389
6/30/10 4:23 PM
20_617779-ch13.indd 389
20_617779-ch13.indd 389 6/30/10 4:23 PM